
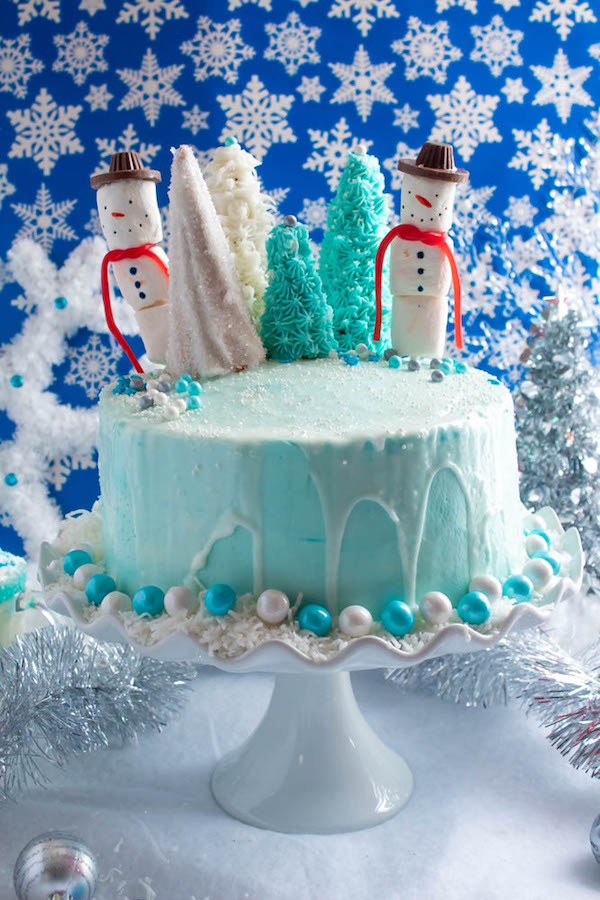
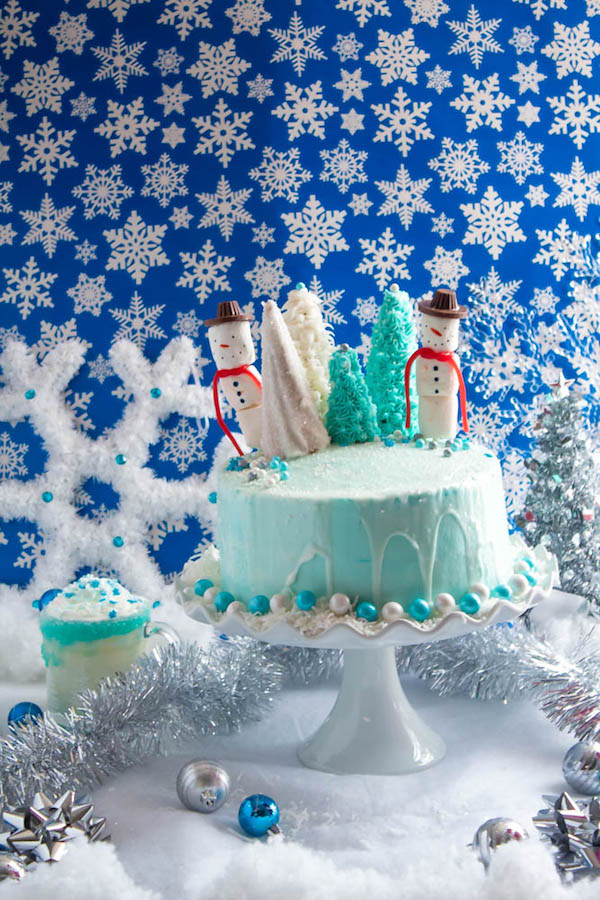
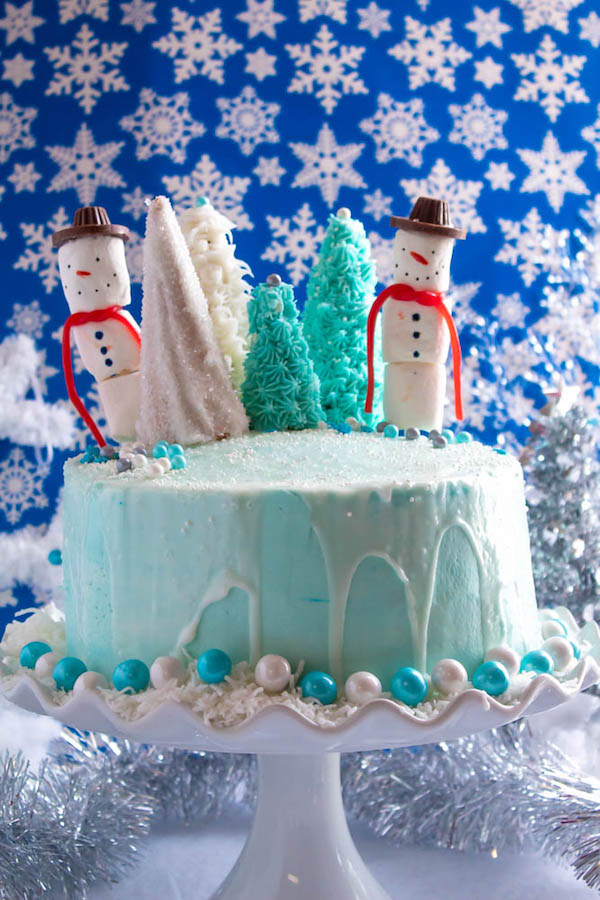
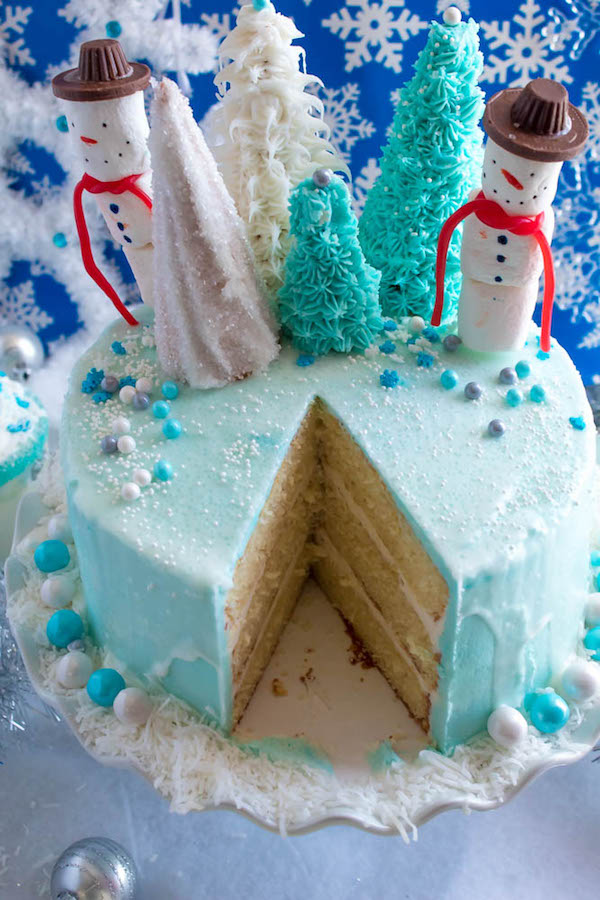
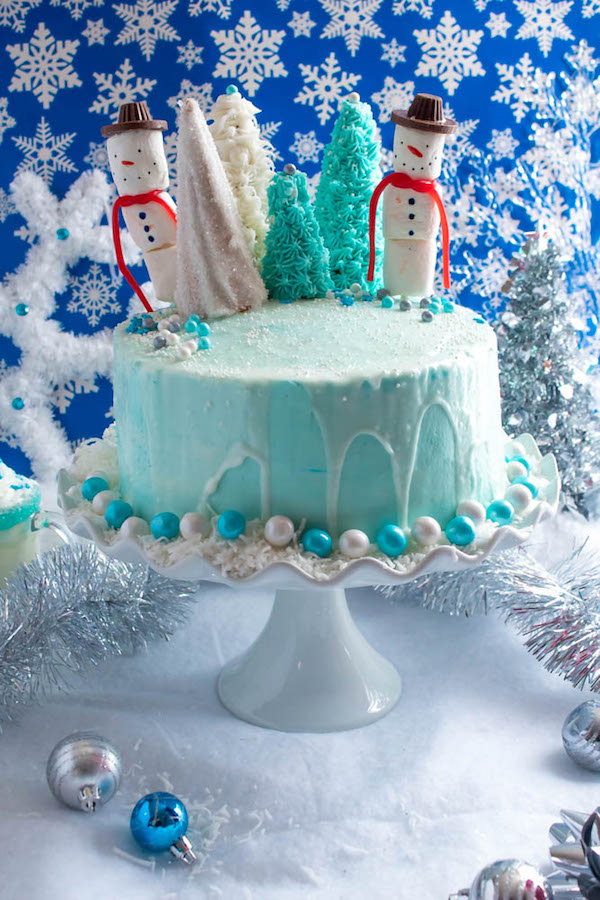
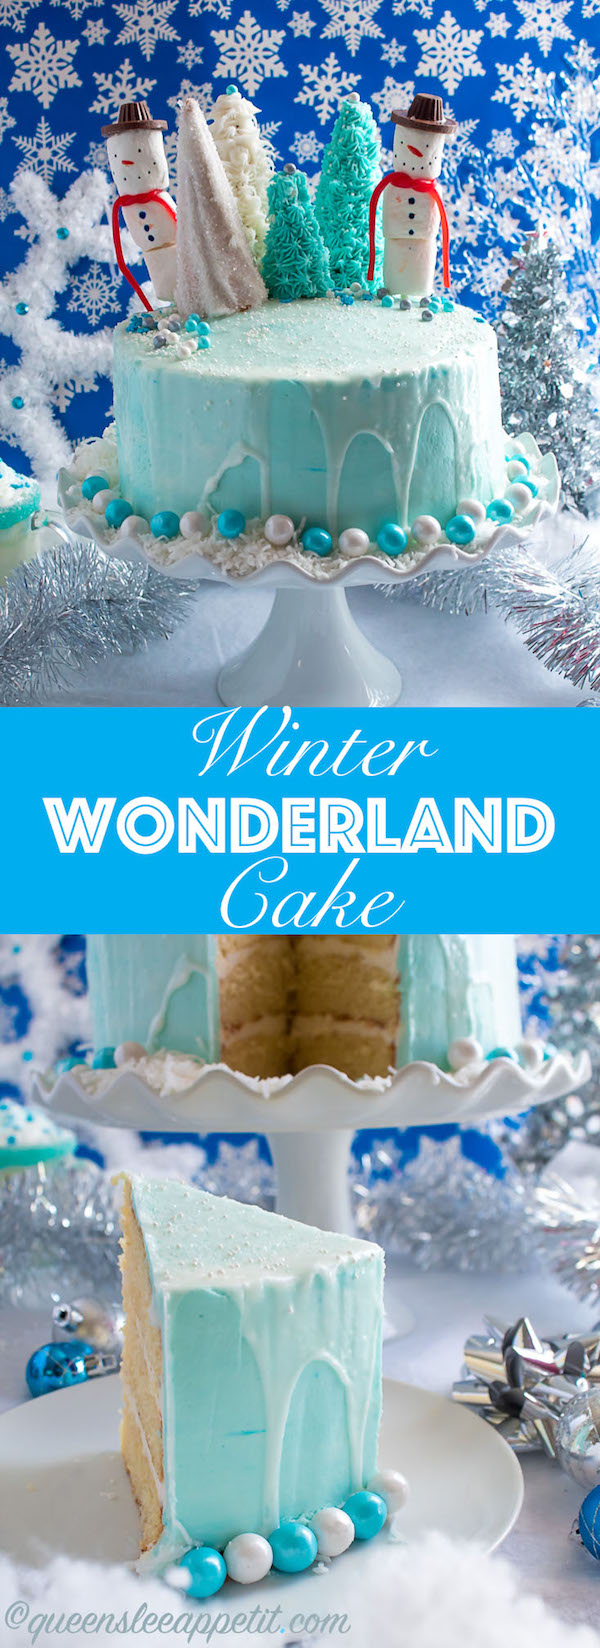
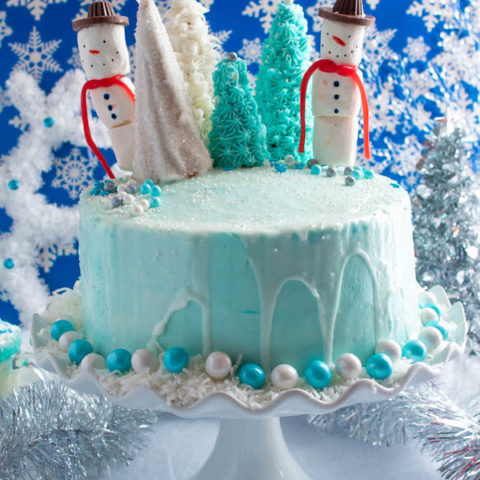
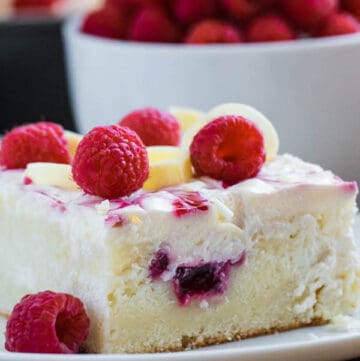
This Winter Wonderland Cake has all the magic and beauty of winter inside a cake! With a wintery white and blue theme, marshmallow snowmen, sugar cone Christmas trees and a powdered sugar snow drip, this is the perfect dessert for your Winter Wonderland themed party!
Winter is here and Christmas is near. The holidays are quickly approaching, and this cake would be the perfect addition to your celebrations! Your guests will be raving when they see this festive Winter Wonderland Cake!
I've been driving myself mad planning this Winter Wonderland Cake for over a year! Now that I've started this blog, I could finally make my fabulous winter dreams come true! This cake is so adorable and it was so much fun to make!
A little warning, there's a lot to this cake. With the snowmen, Christmas trees, cake layers, frosting etc. This cake could be pretty time consuming. The good thing, however, is almost every part of this cake can be made ahead of time! So the day you plan to serve the cake, you can quickly assemble it without any stress.
Alright, let's break down each part of this cake.
Fluffy Vanilla Cake Layers
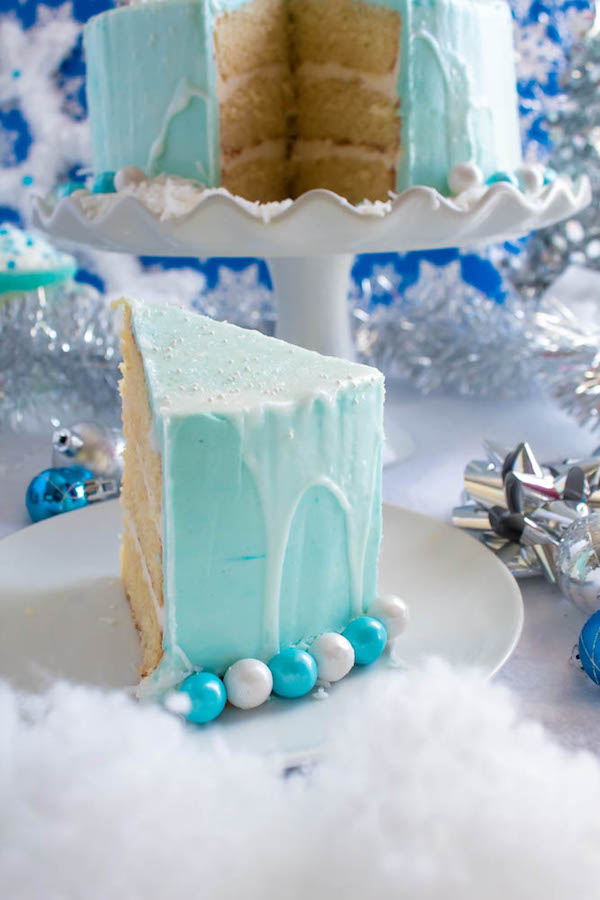
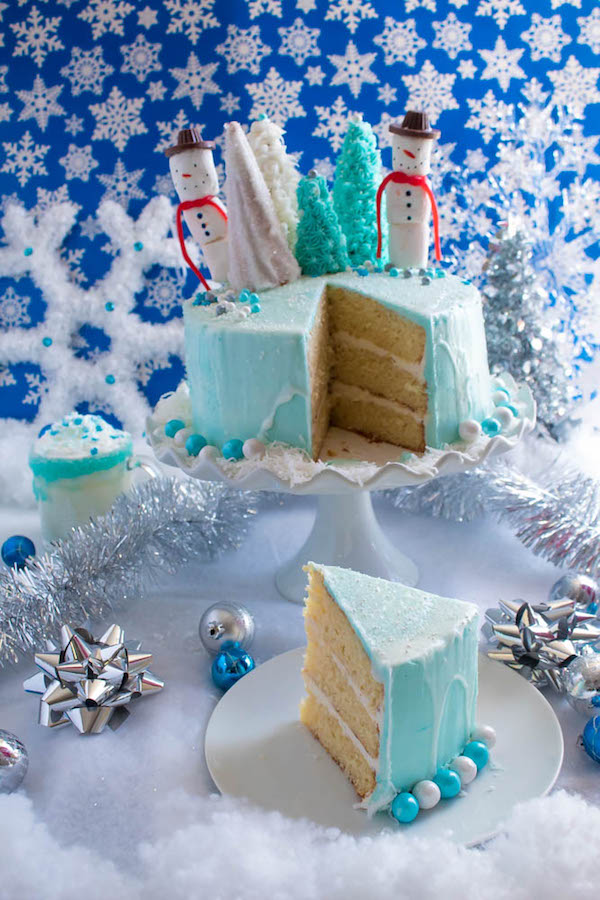
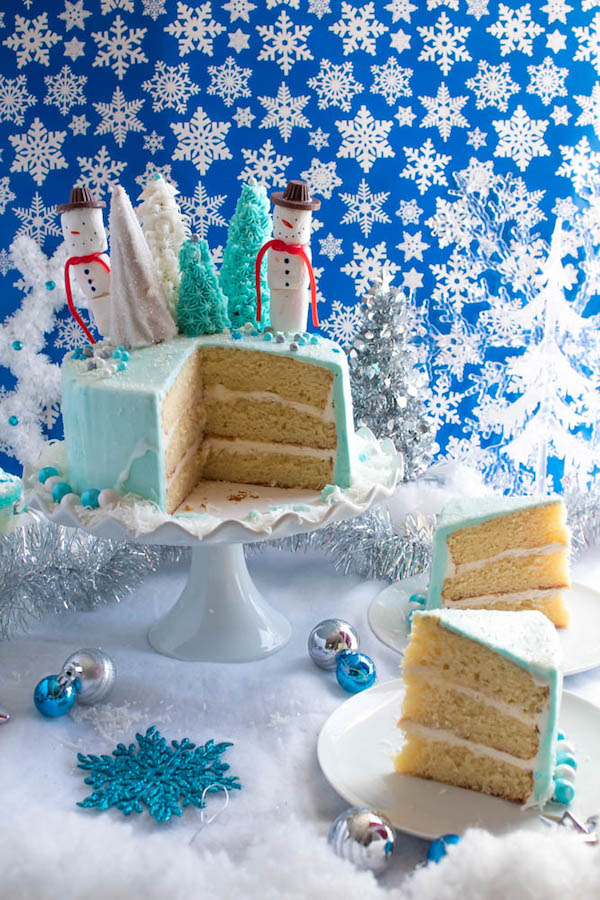
For the inside, I made a simple vanilla cake from scratch. Honestly, I'm surprised that it came out so well, since this was the first time I tested my recipe. The cake is so incredibly fluffy and delicious!
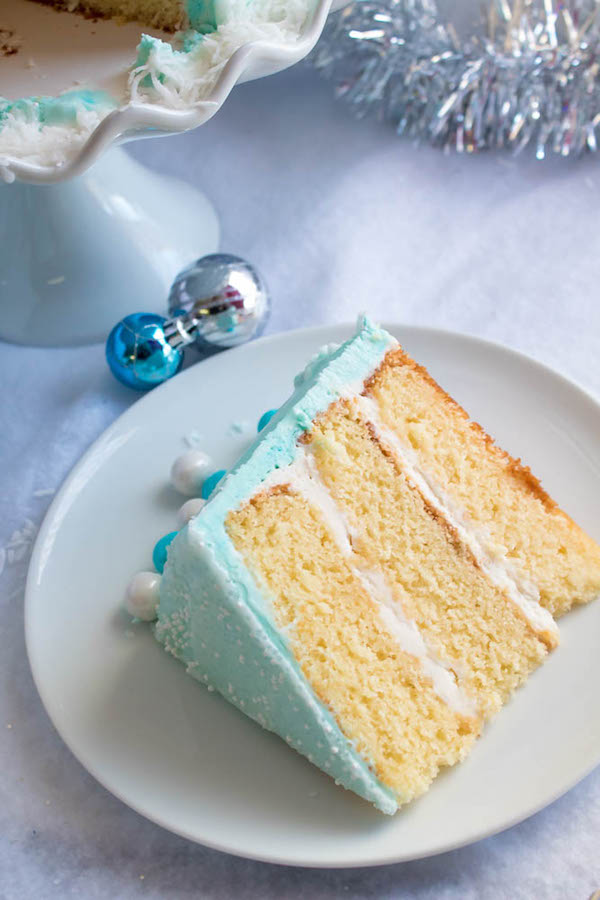
The vanilla cake does take quite a bit of work to make though. I adapted this recipe from my Vanilla Cupcakes recipe, but the method is not as simple as they were. For the cupcakes, all you needed to do was mix dry ingredients with wet ingredients, whisk and you're done. This cake requires a bit more work since we're using butter.
I used the creaming method for the cake, which basically means we beat the butter and sugar together for a few minutes until it's nice and fluffy. Then mix in the eggs, one at a time, and then the vanilla. For the next step, you'll need to alternate between adding the dry ingredients and the buttermilk. If you add the buttermilk all at once, the batter will separate and ruin the cake. If you add all of the dry ingredients all at once, the batter will be too thick, which means you'll end up over mixing, which ultimately leads to a tough cake.
All in all, as long as you follow the steps to the T, you'll end up with the most perfect vanilla cake!
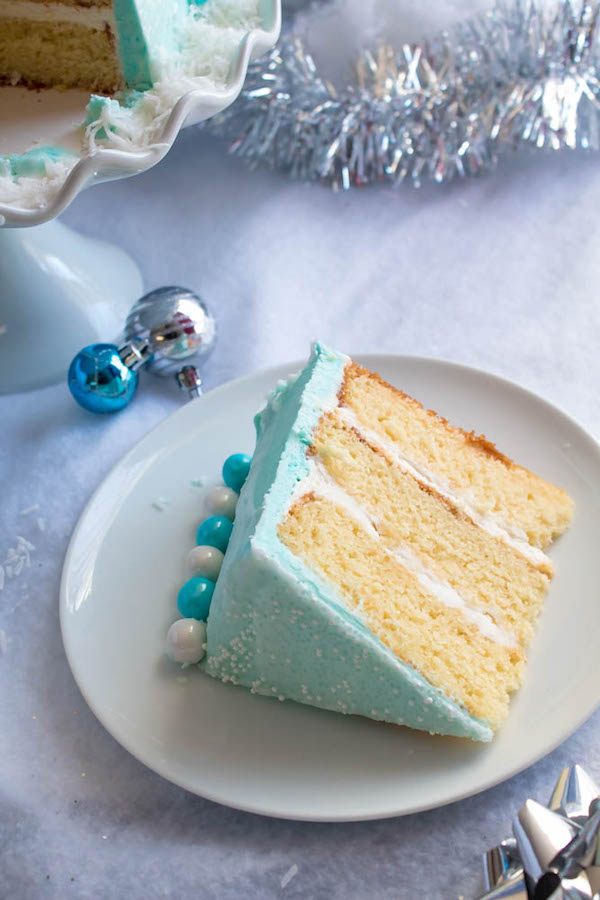
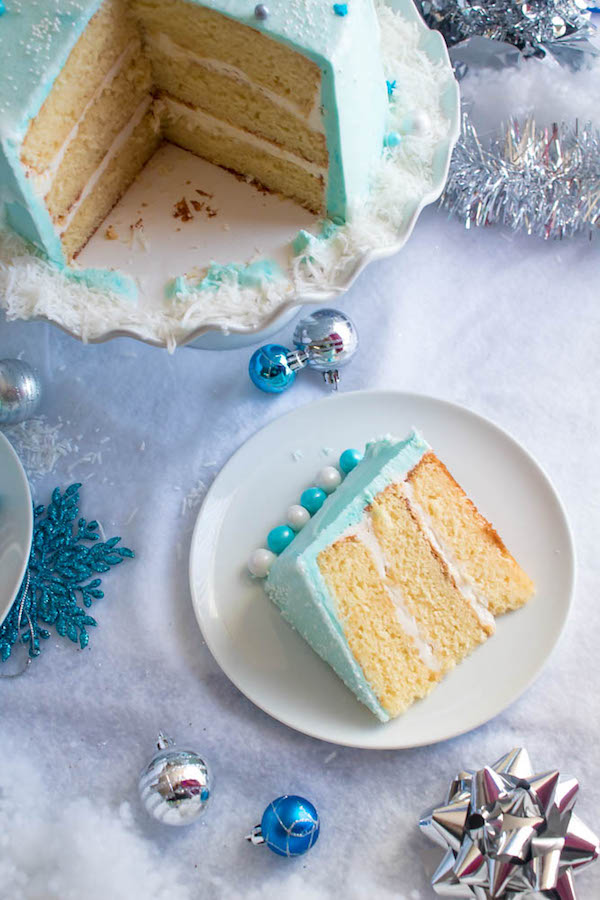
Wintery Blue and White Frosting
For the frosting, I made a batch of my fluffy and dreamy vanilla buttercream. This is the best vanilla frosting you could ever make. It never fails me and comes out perfect every time!
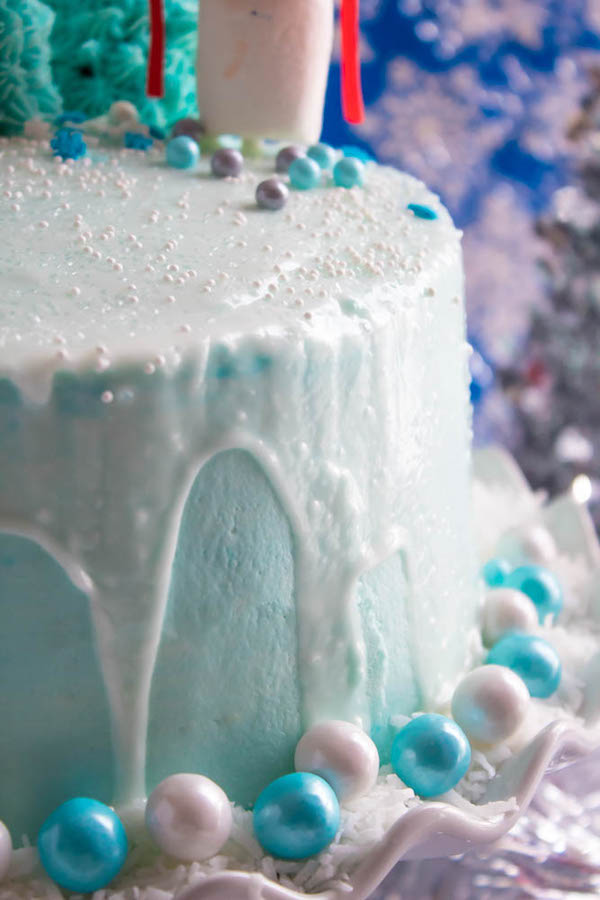
I tinted the frosting with Sky Blue Gel Food Colouring, but I didn't mix it all the way through because I wanted there to be some streaks of white.
Sugary Snow Glaze
For the "snow" or "icicle" drip, I made a simple glaze using powdered sugar and milk. The glaze was a bit thinner than I'd liked. I wanted to give the appearance of thick snow gliding down the side of the cake, but it didn't really work out. If you want thicker snow, I recommend microwaving a jar of marshmallow fluff until it's thin enough to pour, then pour it over the top of your cake!
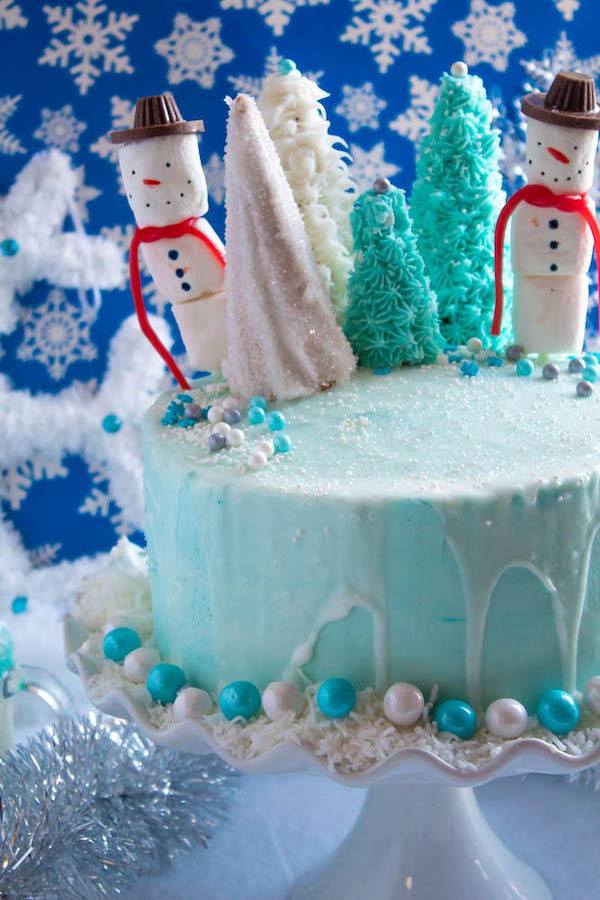
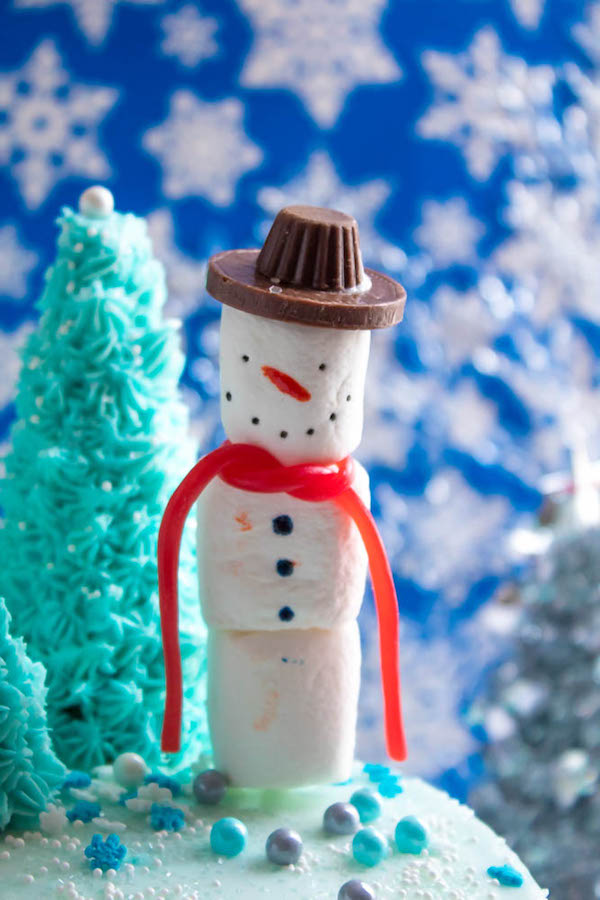
Marshmallow Snowmen
You can't have a winter wonderland without snowmen, so I made my own using marshmallows! Aren't they adorable?
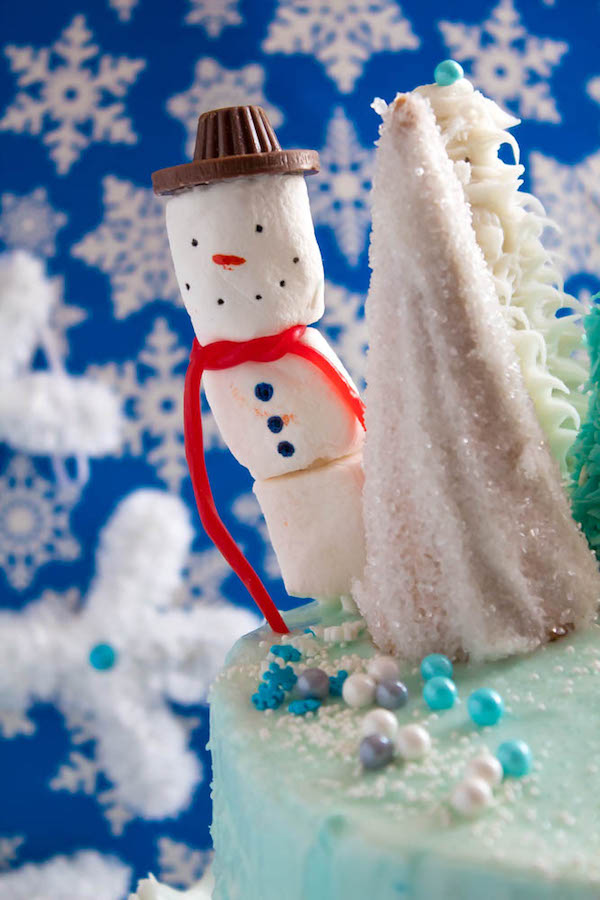
The marshmallow snowmen are extremely simple to make. All you need is some lollipop sticks, marshmallows, gel food colouring, chocolate coins, mini Reese's cups, twizzlers and royal icing.
To start, I put 3 marshmallows on the stick to act as the snowman's body. Then, using royal icing, I stuck a mini Reese's cup onto a chocolate coin to make a hat. Attaching the hat onto the marshmallow was pretty difficult, because the head of the marshmallow was pretty lopsided so the hat kept slipping off. I recommend standing the marshmallow stick upside down while it dries.
For the eyes, mouth and buttons, I used black and orange gel food colouring. This was the quickest and easiest method for me. Just dip the tip of a toothpick in the food colouring and poke it into the marshmallow.
Lastly, to make the scarf, I used red twizzlers. Make sure you use the pull-apart kind so you can have a thin strip to wrap around the marshmallow.
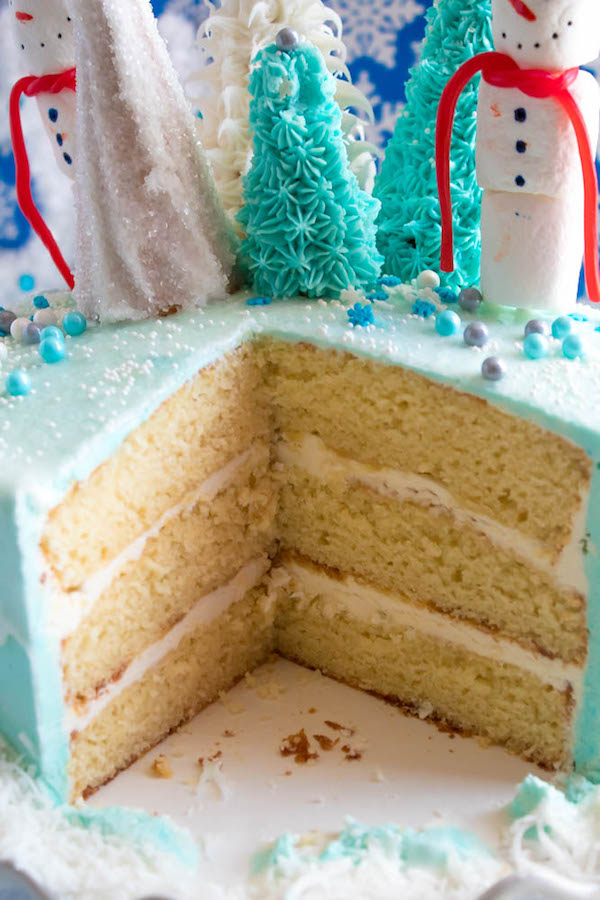
Sugar Cone Christmas Trees
My favourite part about this cake is the gorgeous Sugar Cone Christmas Trees! I went with white and blue Christmas trees, since those are classic winter wonderland colours, but you can make them green if you want. I used store-bout frosting to make some of the trees, because the frosting for the cake wasn't enough to make as much as I wanted.
To make the Christmas trees I simple used a small star tip to pipe stars around the sugar cone, from bottom to top. I used 2 different piping tips, Wilton 21 and Wilton 22. As you can see, both tips create different textures which I love!
And for one of the trees, I spread some frosting over the cone and rolled it in sparkling sugar to make a more glamorous and girly tree!
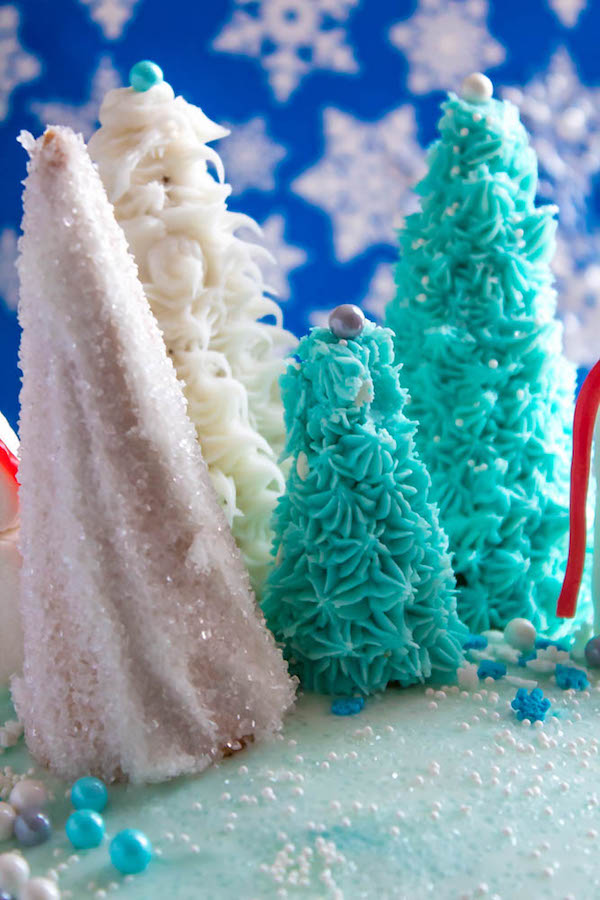
To complete the winter wonderland look, I decorated the top with white nonpareils, sanding sugar, snowflake sprinkles, and "winter wonderland beads" I found at my local bulk store. I originally planned on dusting the entire cake with powdered sugar but I FORGOT! Ugh!! That just hit me, and I'm so frustrated because that would've added a beautiful wintery look to the cake.
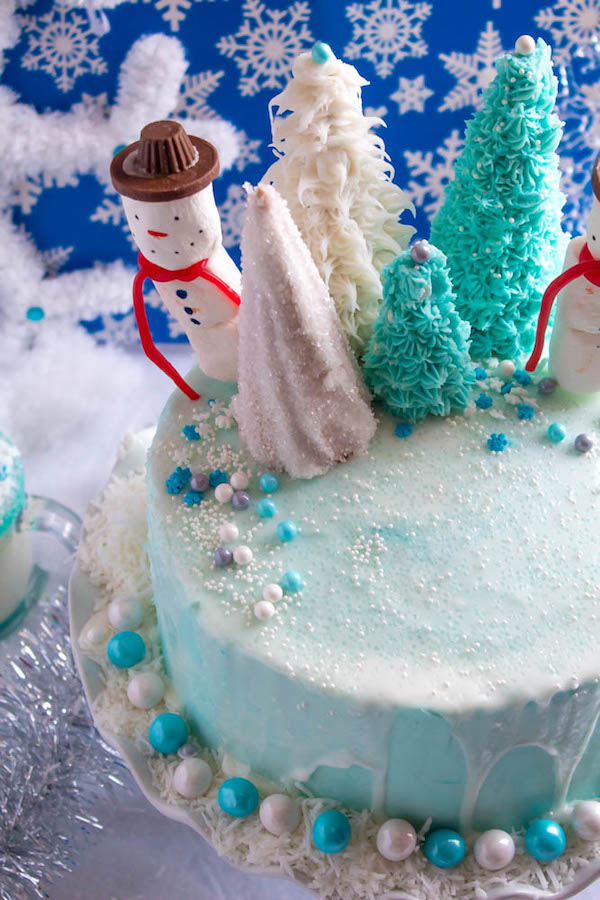
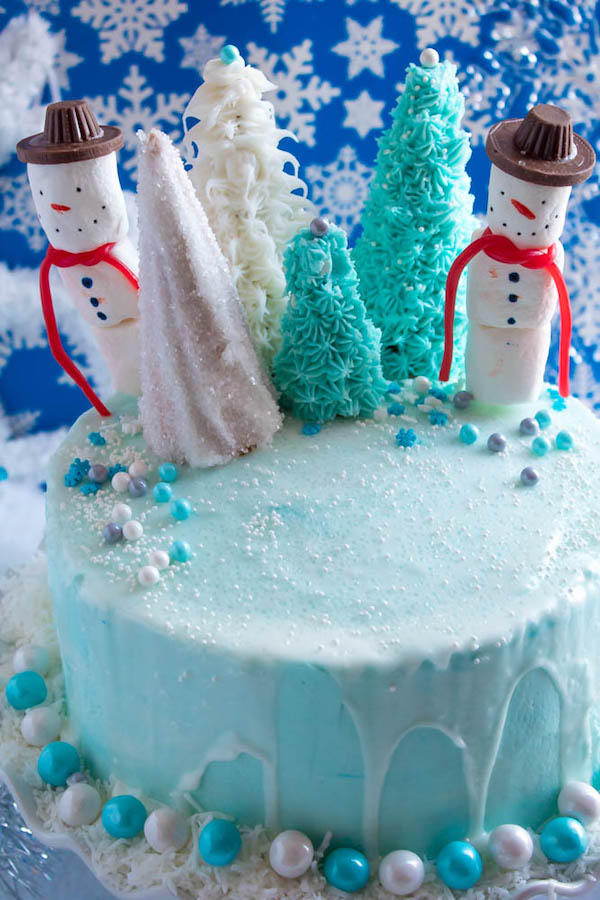
For visual presentation, I covered the bottom of the cake with shredded coconut and lined it with blue and white pearl gumballs. This, of course, is optional, but highly recommended if you're serving it at a party.
Not sure if I should call this "Winter in Cake Form" or "Christmas in Cake Form". Let's go with both! From the delicious and fluffy vanilla cake to the fun and festive wintery decoration, this cake is a winter wonderland dream! Add this cake to your holiday dessert menu to brighten up your Christmas table!

>>Pin Me For Later!<<
SHOP THE RECIPE
8-inch cake pans | Blue sanding sugar | White sanding/sparkling sugar | Snowflake sprinkles | White non-pareils | Wilton Sky Blue Gel Food Colouring | Kitchenaid Stand Mixer | Wilton Tip 21 | Wilton tip 22 | White pearl gum balls | Blue pearl gum balls |
Follow Queenslee Appétit
Pinterest | Instagram | Facebook | Twitter |
Did you make a recipe? I'd love to see how it turned out! Follow me on Instagram and use the hashtag #queensleeappetit so I can see all of the Queenslee Appétit recipes you've made!
Let's get baking!
Winter Wonderland Cake
This Winter Wonderland Cake has all the magic and beauty of winter inside a cake! With a wintery white and blue theme, marshmallow snowmen, sugar cone Christmas trees and a powdered sugar snow drip, this is the perfect dessert for your Winter Wonderland themed party!
Ingredients
Vanilla Cake Layers:
- 3 cups all purpose flour
- 1 tablespoon baking powder
- ¼ teaspoon baking soda
- 1 teaspoon salt
- 1 and ½ cups unsalted butter, room temperature
- 2 and ¼ cups granulated sugar
- 4 large eggs, room temperature
- 1 tablespoon Vanilla Extract
- 1 and ½ cups buttermilk, room temperature
Marshmallow Snowmen:
- Regular sized marshmallows
- Wooden skewers or Lollipop Sticks
- Royal icing
- Mini Reese's Cups or Rolo candies
- Chocolate coins
- Black gel food colouring
- Orange gel food colouring
- Blue gel food colouring (or any colour of your choice)
- Toothpicks
- Pull apart Twizzlers
Christmas Trees:
- Large and small Ice Cream Sugar Cones (cut some in half)
- 3 cups vanilla frosting (see notes)
- White sanding sugar
- Blue sanding sugar
- Blue gel food colouring
- Snowflake sprinkles
- White non pareils
- Sugar Pearls
Vanilla Buttercream:
- 1 cup Unsalted Butter, slightly softened
- 1 cup Hi-ratio Shortening
- ⅛ teaspoon salt
- 8 cups Powdered Sugar, sifted
- ½ cup Heavy Whipping Cream
- 1 tablespoon Pure Vanilla Extract
- ½ teaspoon Pure Almond Extract
- Sky Blue Gel food colouring
Snow Drip:
- 2 cups Powdered Sugar
- 2-3 tablespoon milk
- White sanding sugar
Additional:
- White Sparkling Sugar
- White non pareils
- Powdered Sugar, for dusting
- Shredded coconut
- White pearlized gumballs or sixlets
- blue pearlized gumballs or sixlets
Instructions
For the Vanilla Cake Layers:
- Preheat oven to 350° F (177°C). Prepare three 8x2-inch round cake pans with parchment rounds, and grease the sides. Set aside.
- In a large mixing bowl, sift the flour, Baking powder, Baking soda and salt. Whisk to combine. Set aside.
- In the bowl of a stand mixer fitted with a paddle attachment, beat the butter and sugar on medium speed until light and fluffy, 3-4 minutes. Scrape down the sides and bottom of the bowl.
- Lower speed to medium-low and add the eggs one at a time. Make sure to occasionally stop and scrape down the bowl. Mix in vanilla extract.
- Alternately add dry ingredients in thirds and buttermilk in 2 additions to the batter, beginning and ending with the dry ingredients. Beating each addition just until combined. Turn speed back up to medium and beat for another 30 seconds- 1 minute, until batter is smooth.
- Divide batter equally between three cake pans, a little over 2 cups per pan. Bake for 25 - 30 minutes or until a toothpick inserted into the center comes out clean and cake springs back when lightly touched.
- Remove cakes from oven and allow to cool in pans for about 10 minutes, then turn onto cooling racks to cool completely.
For the Marshmallow Snowmen:
- Put 3 marshmallows on a wooden skewer or a lollipop stick.
- Use royal icing to attach a mini Reese's cup to the middle of a chocolate coin. Use the icing to glue the hat on top of the marshmallow.
- Dip the tip of a toothpick into the black gel food colouring and poke eyes and a mouth into the head of the snowman.
- Dip a toothpick into the orange colouring and press the side of the toothpick in the middle of the face to make the nose.
- Dip another toothpick in blue or any colour food colouring you want and press it deeply into the body to make 3 large buttons.
- Pull the twizzler apart to get thin strips. Wrap the twizzler around the marshmallows as a scarf.
- Place snowmen into a tall glass and set aside.
For the Christmas Trees:
- Spread some frosting over each cone. Roll one cone in the sparkling sugar. Set aside.
- Add half of the frosting to a disposable piping bag fitted fitted with a small star tip, I used Wilton 21 and Wilton 22. Set aside.
- Tint the remaining frosting with the blue gel food colouring and transfer to a separate piping bag fitted with a small star tip.
- Using either the white or blue frosting, pipe stars over the entire cone, starting from the bottom and working your way up. Leave the top of the cone empty so you can lift it up and place it onto the cake without ruining your design.
- Decorate the cones with the snowflake sprinkles, nonpareils, sanding sugar and sugar pearls. Set the cone trees aside.
For the Vanilla Buttercream:
- In the bowl of a stand mixer fitted with the paddle attachment, or in a large bowl with a hand-held mixer, beat the butter, shortening and salt on medium speed until light and fluffy (about 5-6 minutes).
- Turn the mixer to low, and gradually add half of the sugar one cup at a time. Once incorporated, add heavy cream, vanilla and almond extract and beat until combined.
- Add the remaining powdered sugar one cup at a time and mix on low until combined.
- Once the sugar is combined, increase mixer speed to high and whip until light and fluffy, about 5-7 minutes.
For the Snow Drip:
- Add the milk to the powdered sugar and stir until combined and smooth. Set aside.
Assembly of the Winter Wonderland Cake:
- Place one cake layer on a turntable. Spread about 1 cup of frosting on top. Repeat with all layers, placing the final layer upside down.
- Frost the entire cake with a thin layer of the vanilla buttercream. Chill the cake for 30 minutes. Tint the remaining frosting blue, but don't mix it completely. We want some white to show through.
- Remove cake from refrigerator and frost the entire cake with the blue and white frosting. Use a bench scraper to smooth the sides and an offset spatula to smooth the edges and top.
- Transfer the white "snow" glaze to a disposable piping bag and snip off the tip. Drip the glaze off the edge of the cake and fill the center. Use an offset spatula to to spread the glaze over the top. Sprinkle some white sanding sugar over the top, along with sparkling sugar and non pareils.
- Carefully transfer cake to your serving plate or a cake stand. Carefully place the Christmas trees on top of the cake and finish piping stars on the tip. Place a small pearl on top.
- Insert your snowmen into the top of the cake.
- Dust some powdered sugar over the entire cake, trees and snowmen etc. to create a snowfall effect.
- This part is optional, but it adds a lot to the Winter Wonderland theme —Cover your cake stand or plate with shredded coconut to act as snow. Place blue and white pearl gum balls or sixlets around the bottom of the cake. Serve at your Christmas party and enjoy!
Notes
* Cake layers can be made a few days ahead of time. Wrap tightly in plastic wrap and store in the freezer.
* Marshmallow snowmen and Christmas trees can be made a day ahead. Store in an airtight container at room temperature.
* For the trees, I picked up some pre-made frosting at the bulk store. You can double my vanilla frosting recipe if you'd like but you'll have a lot of extra frosting.
* if the snowman's hat won't stay on, try to stand the snowman upside down, balancing on the hat so it can dry.
©QUEENSLEE APPÉTIT. All images & content are copyright protected. Please do not use my images without prior permission. If you want to republish this recipe, please re-write the recipe in your own words, or link back to this post for the recipe.
Bon Appétit!
Love, Dedra ❤️
This post may contain affiliate links. Please see my full disclosure policy for details.
Leave a Reply