
This post may contain affiliate links. Please see my full disclosure policy for details.
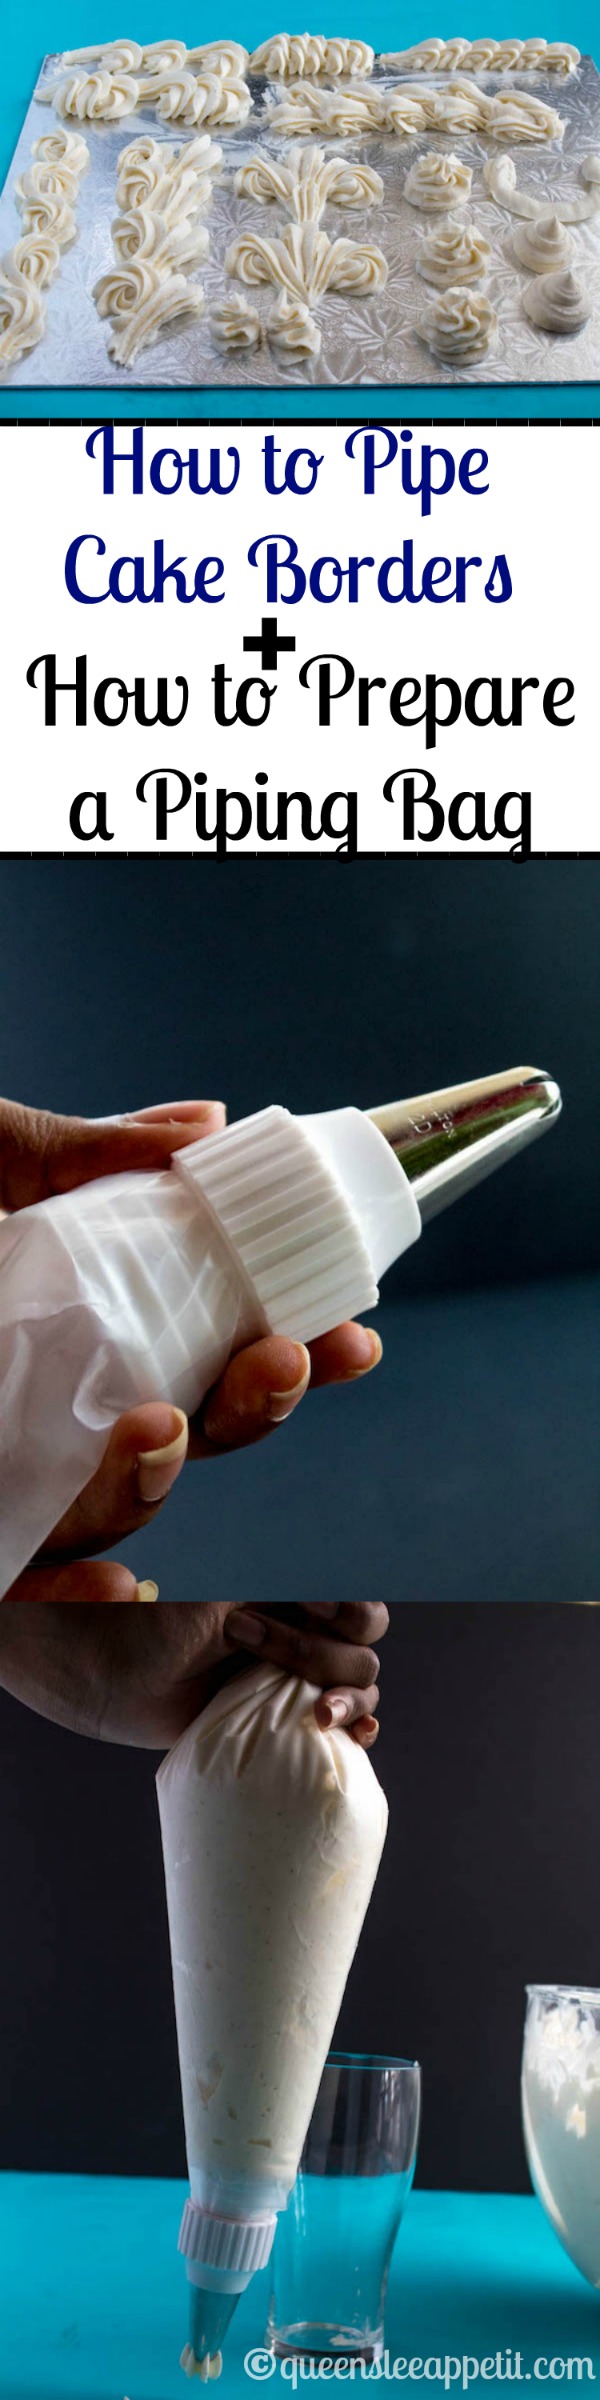
If you're a cake decorating newbie, this is the perfect tutorial for you! I'm a self-taught home baker and not a professional in any way, but with some research and practice I've taught myself many new skills, for example: How to pipe cake borders!
Now I've decided to share some of the skills I've learned with all of you! This cake border guide has 11 simple techniques that will really make your next cake stand out!
I believe a border really adds a lot to a cake. It can take a plain frosted cake from boring and basic to elegant and beautiful. And they're so easy to make!
What type of frosting should I use?
Buttercream and royal icing are the most common icings used for cake decorating, but I'm a firm believer in "if you can pipe it, you can decorate with it." So as long as whatever icing, ganache, whipped cream etc. you decide to use is able to hold its shape when piping, you can use it to pipe a lovely border around your cake.
For this tutorial, however, I used my Dreamy Vanilla Buttercream recipe. It's the perfect buttercream for cake decorating, because not only does it pipe beautifully, but it is a crusting buttercream which means it will hold its shape in warm weather, so there's no need to worry about your beautiful designs melting off.

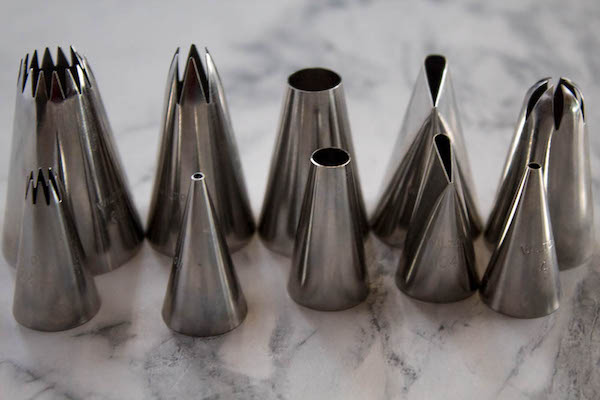
Tools you'll need
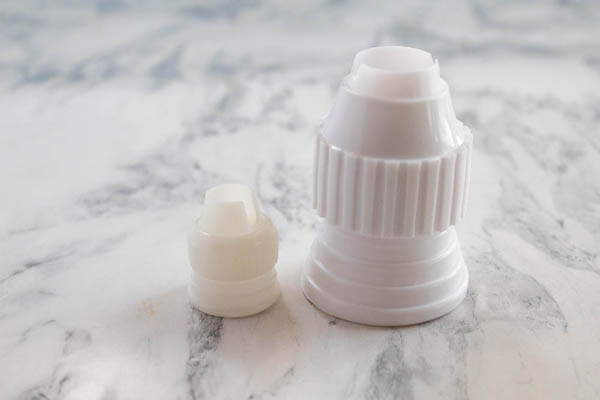
You will also need a decorating bag or disposable piping bags and piping tips. If you plan on using different tips on a cake or cupcake, I recommend using a coupler, which allows you to remove one decorating tip and replace it with another.
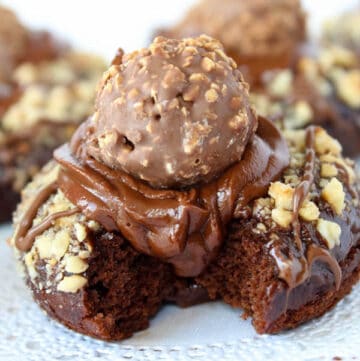
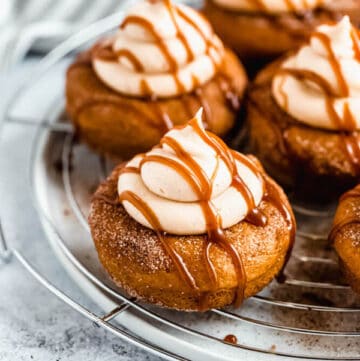
Before we get to the border piping, Here's a guide to show you how to prepare your piping bag:
How to assemble and fill a piping bag:
- Choose the piping bag and tip of your choice. I always use a re-usable decorating bag for large tips and disposable piping bags for smaller tips since I don't use small tips that often, and my decorating bags are already cut to fit larger tips.
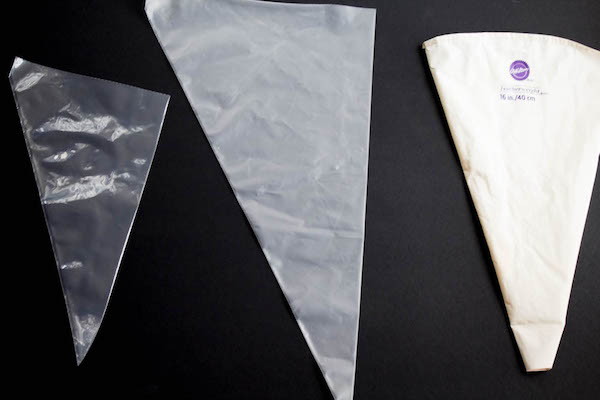
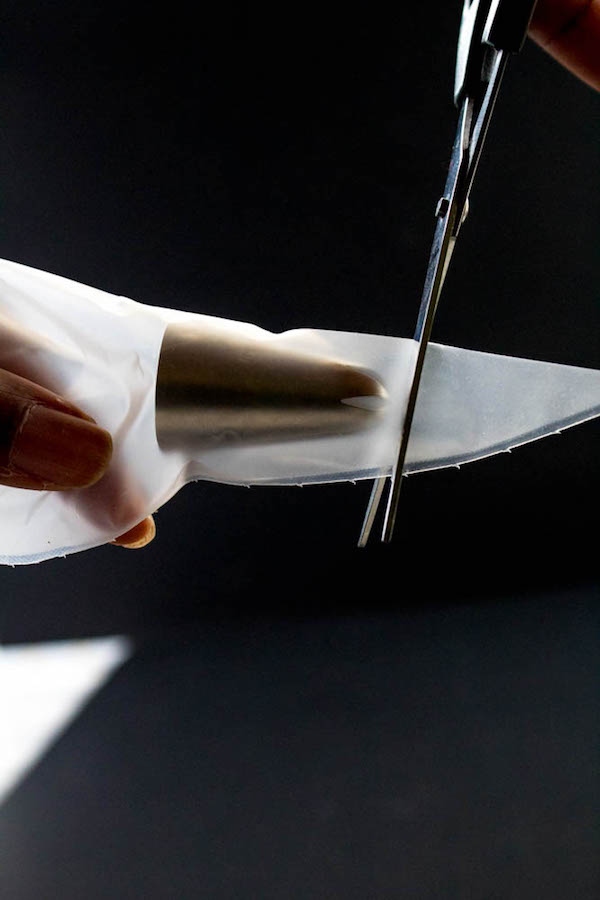
2. For disposable piping bags, place the piping tip of your choice into the bag, letting it fall as far to the tip as it can go. This will determine where you need to snip. If using a coupler, snip the bag to fit the size of the coupler's base.
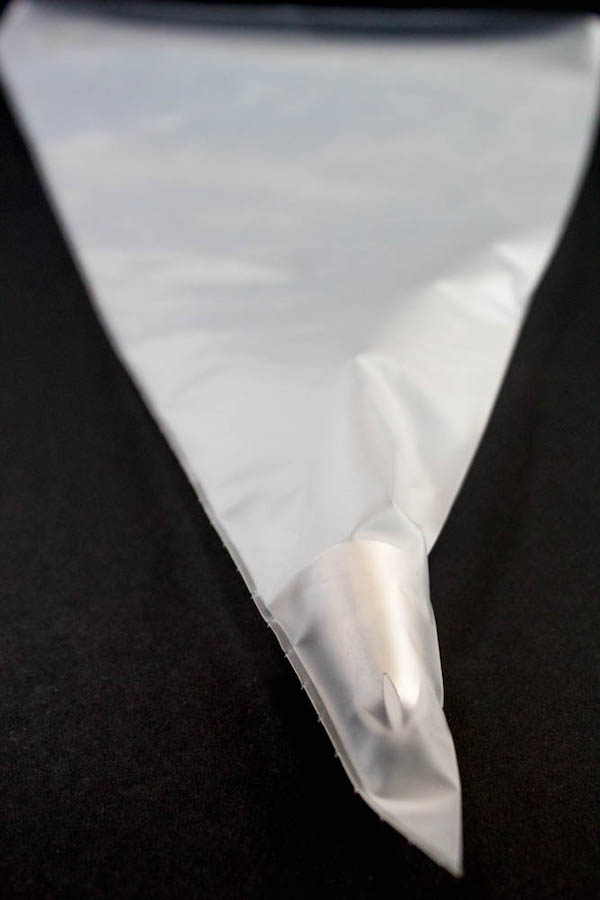
3. Line your scissors about 1-inch above the bottom of the piping tip. Keep your scissors there and push the piping tip up, then cut off the tip of the bag. Do not cut too far because your tip will fall out and you will have to try again with another bag.
4. If you are using a coupler, remove the ring and insert the larger piece into the piping bag and push to the end.
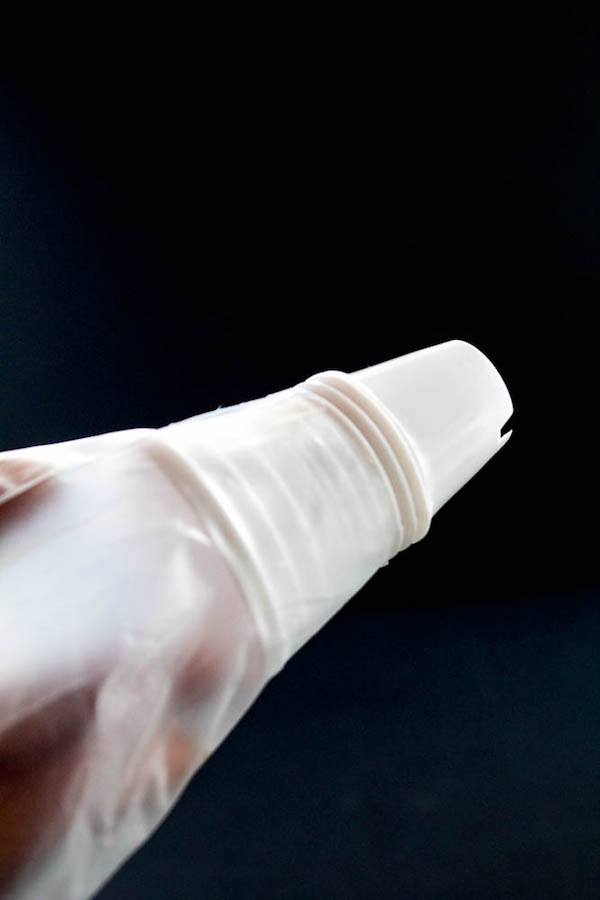
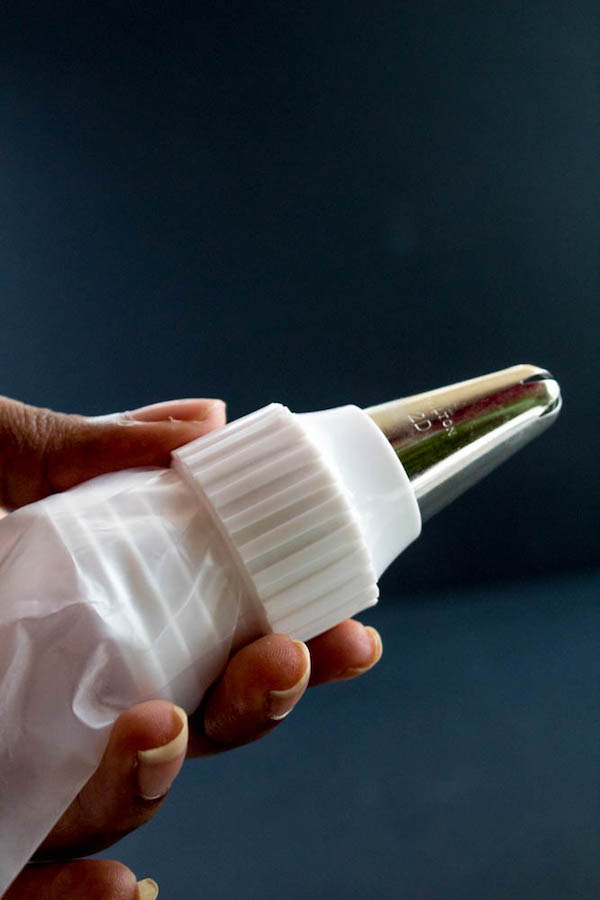
5. Place your piping tip onto the bottom of the coupler (if you are using a large coupler, you should use a large tip, and a small coupler for a small tip).
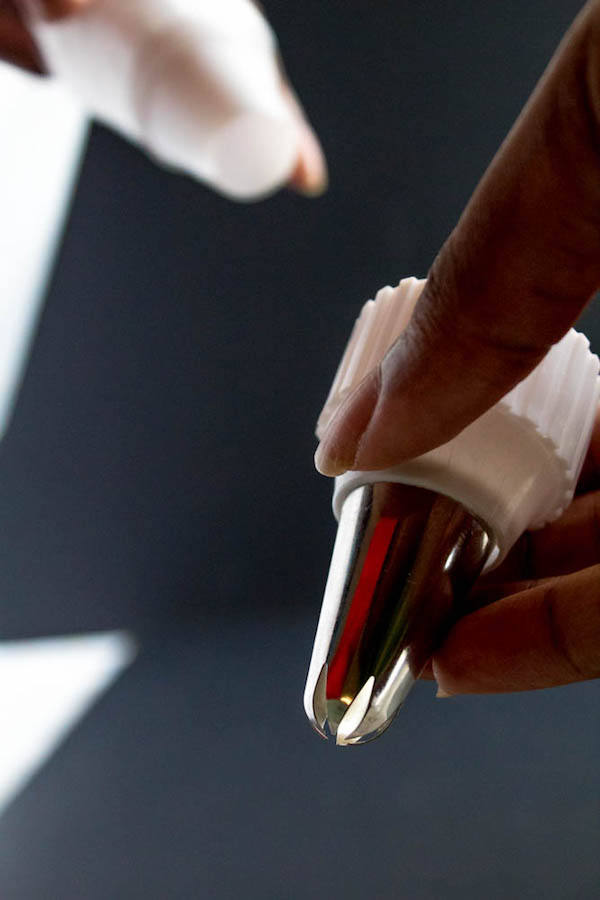
6. Place the coupler ring over the piping tip and twist tightly to secure the tip into place.
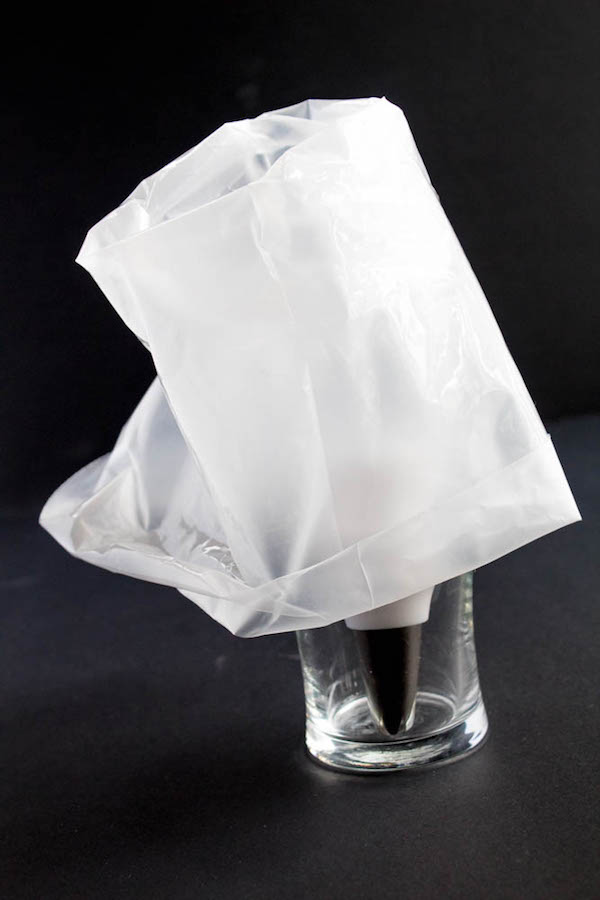
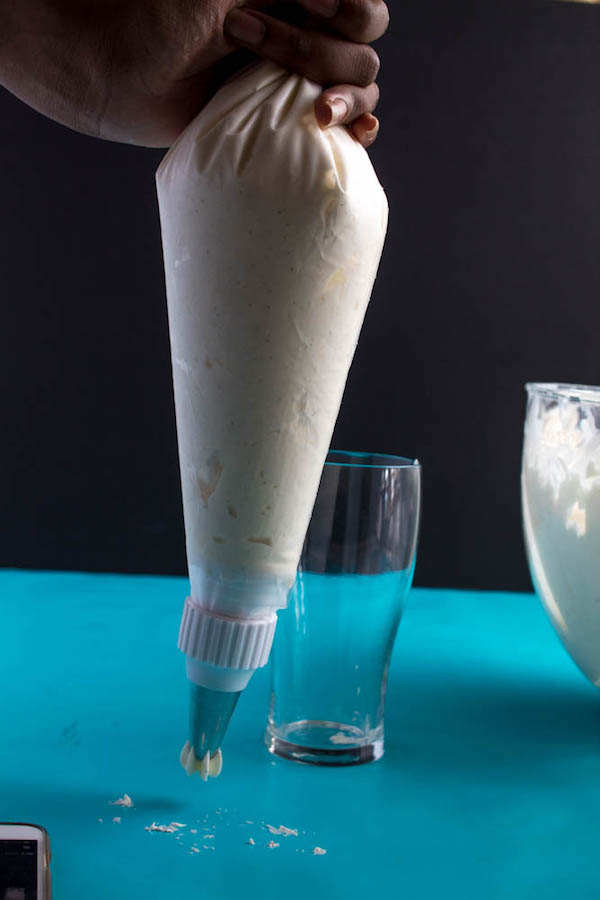
7. To easily fill the piping bag, place the bag into a tall glass and fold the top over the glass.
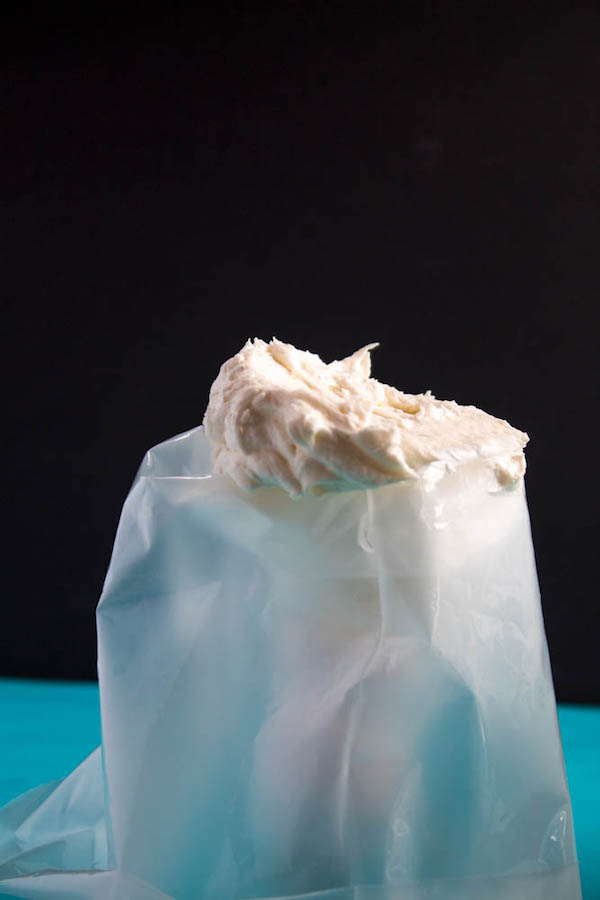
8. Using a rubber spatula or a spoon, scoop out your frosting and place it into the bag. Do not overfill the bag, only fill about ¾ full. If you run out of frosting while piping, just re-fill the bag.
9. Lift up the top half of the bag and remove the entire bag from the glass. Use your fingers to push the frosting down to the tip.
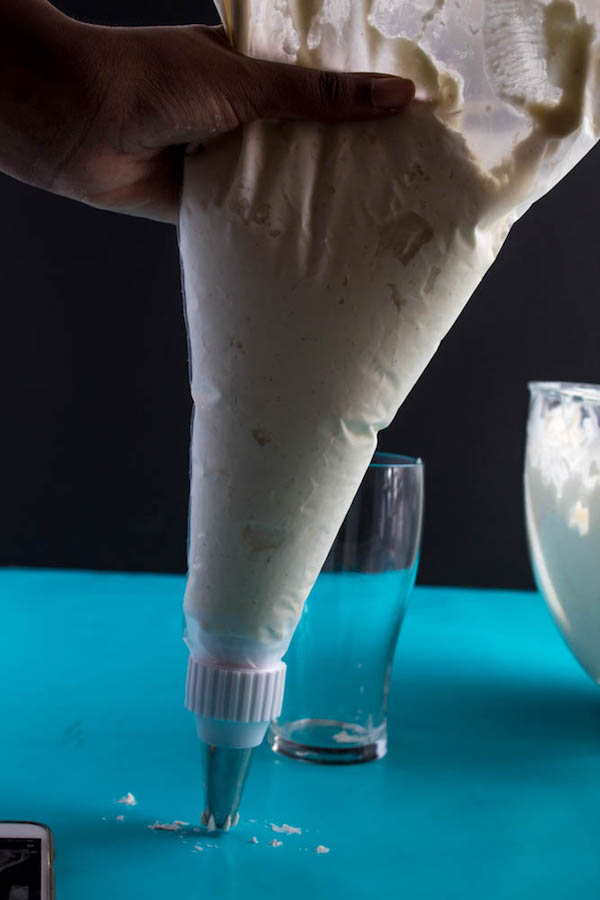
10. Twist the top of the bag, then squeeze over the bowl that contains your remaining frosting. Squeeze out a little frosting to get rid of any air bubbles.
Now that you know how to prepare a piping bag, you are ready to learn the art of cake decorating.
What You Need:
- Buttercream Frosting
- Piping Bag
- Large star tip (I used Wilton 1M, Wilton 6B and Wilton 2D)
- Large round tip (I used Wilton 1A)
- Petal Tip
- Coupler (optional)
- Frosted Cake or parchment paper to practice on
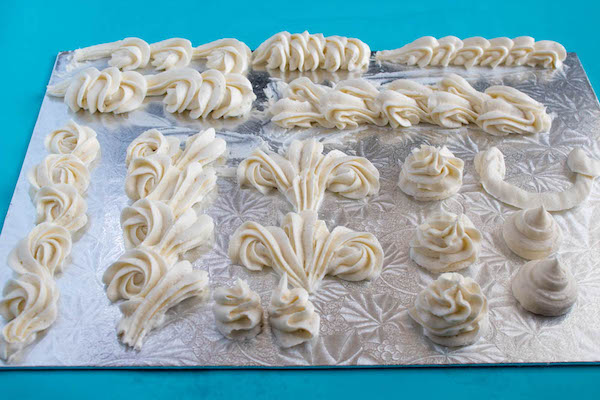
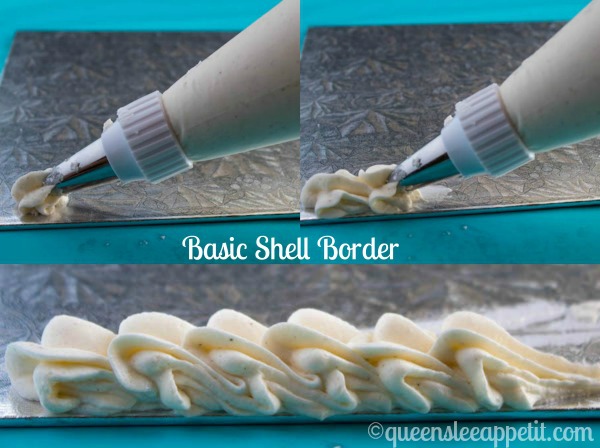
Shell Border:
- hold the piping bag at a 45 degree angle
- Squeeze and allow the frosting to fluff out
- Stop and swipe to create a tail.
- Start the next shell at the end of the previous shells tail so there's enough room for the frosting to fluff out and cover the end of the previously piped shell
- Repeat around the entire cake
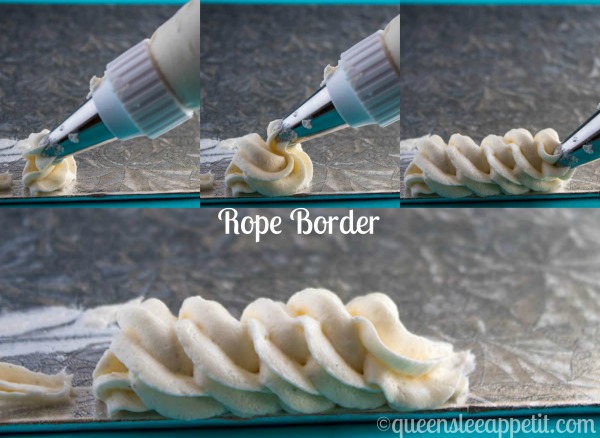
Rope Border:
- Hold the piping bag at a 45 degree angle
- Squeeze out frosting using even pressure and create a rolling motion
- Do not lift too high or too low, make sure you keep an even level
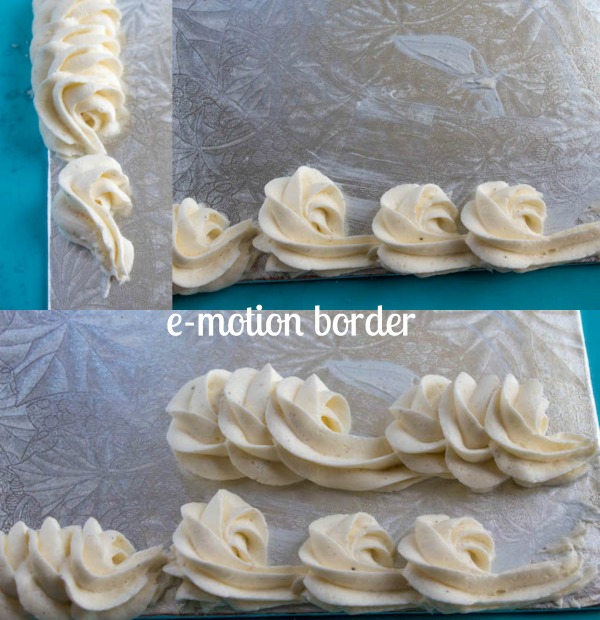
E-motion Border:
- Hold the bag at a 45° angle
- Squeeze icing while creating a lowercase and cursive "e"
- You can continue this motion using an even pressure around the cake OR you can do a triple e-motion border.
- To do that use the same technique mentioned above, but create three "e's" instead of one.
- Once you reach the third "e" squeeze out frosting to create an elongated tail.
- Begin the next set at the end of the previous tail.
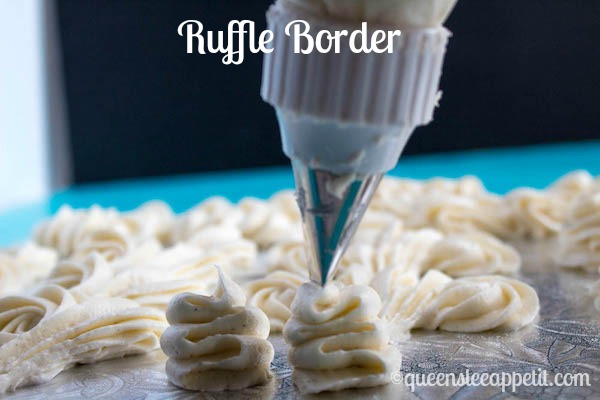
Ruffle Border:
- Using a large petal tip, hold piping tip up at a 90 degree angle slightly above the edge of a cake
- Squeeze out frosting and move bag in a side to side motion to create ruffles. Repeat around the entire cake.
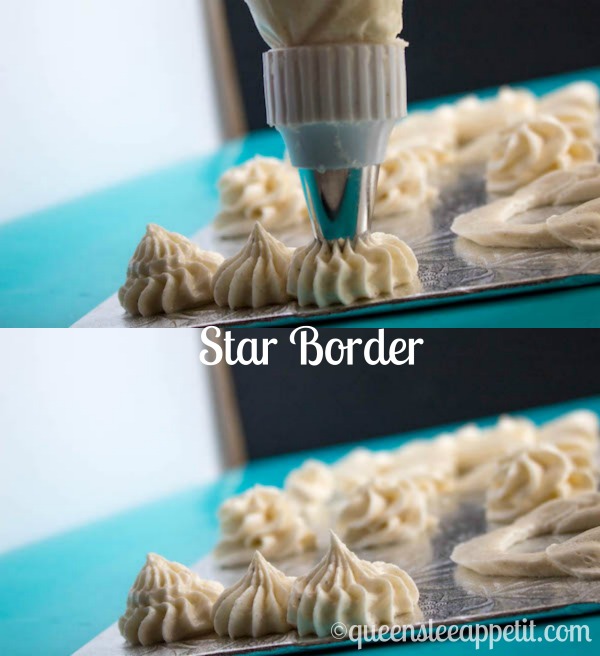
Star Border:
- Hold piping bag at a 90 degree angle slightly above the surface of the cake.
- Squeeze out frosting using an even pressure.
- Slowly release pressure while lifting piping bag to create a point.
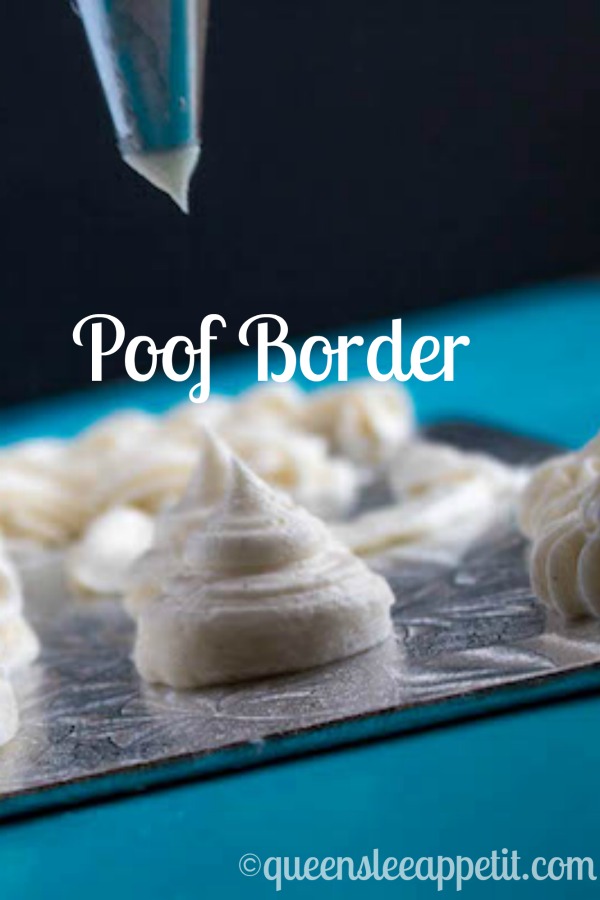
Poof Border:
- This border follows the same technique as the star border except we use a large round tip.
- Squeeze out the frosting until you reach the desired size of your poof.
- slowly lift the bag while squeezing, then release pressure while lifting piping bag to create a point.
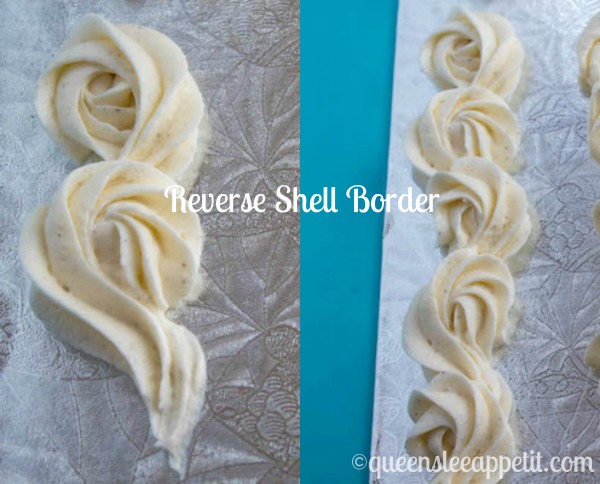
Reverse Shell Border:
- Hold the piping bag at a 45 degree angle
- Squeeze frosting out and move the tip in a counter-clockwise motion.
- Stop and pull tip away to create a tail. Basically creating a 9.
- Start the next shell at the bottom of the previous tail, this time moving clockwise.
- Repeat around the entire cake transitioning between counter-clockwise and clockwise shells.
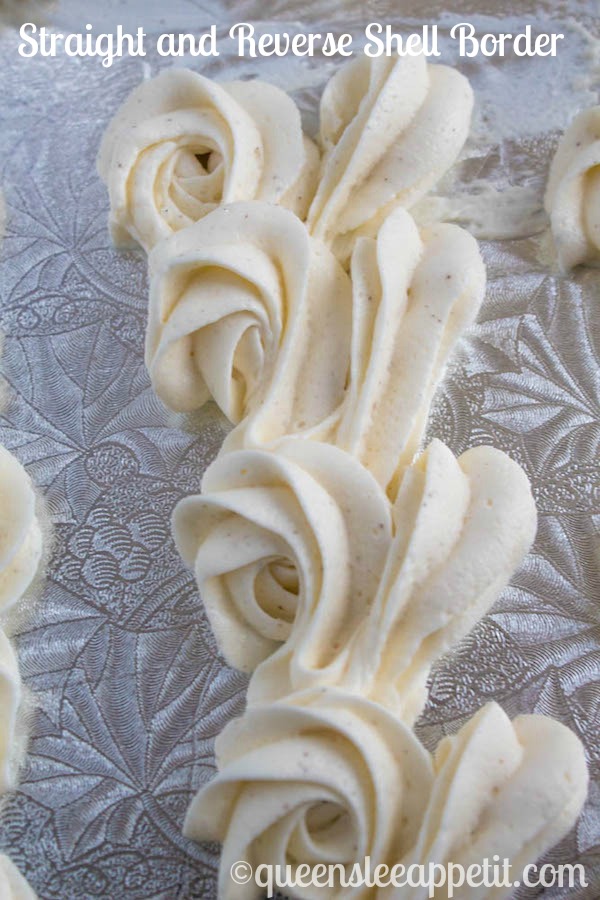
Straight and Reverse Shell Border:
- Follow the steps above to create a reverse shell.
- Once you reach the end create a basic shell right next to the reverse shell.
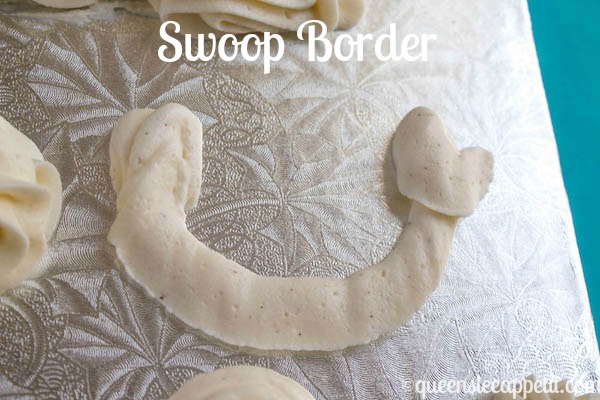
"Swoop" or "Banner" Border:
- Hold piping bag at a 180 degree angle up the side of your cake
- Squeeze a small amount of frosting out then squeeze more frosting on top of that
- Create a 'U' motion and release pressure once you reach the end
- Start next swoop at the end of the previous tail
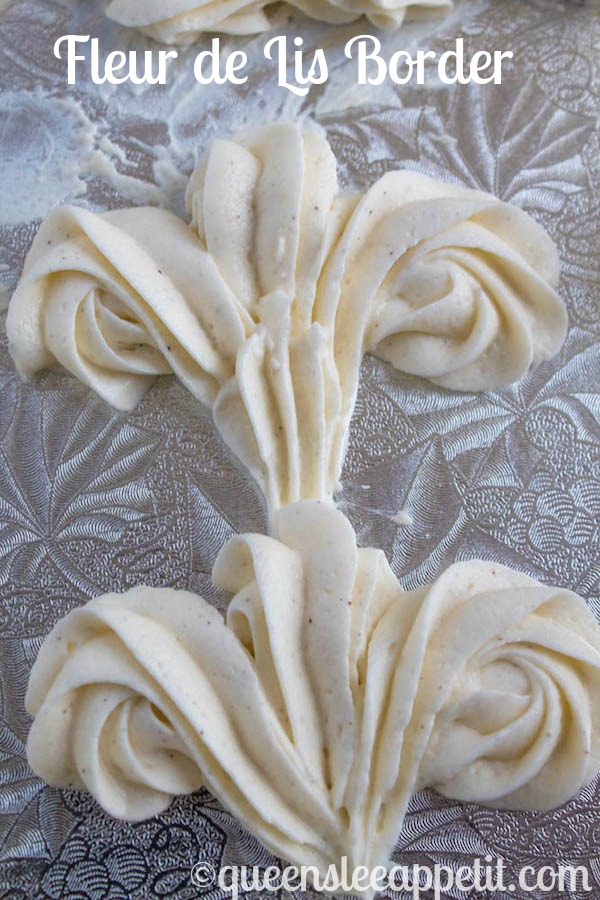
Fleur De Lis Border:
- Pipe a basic shell with an elongated tail in the middle
- then you could either pipe a reverse shell or a basic shell on both sides of the middle shell.
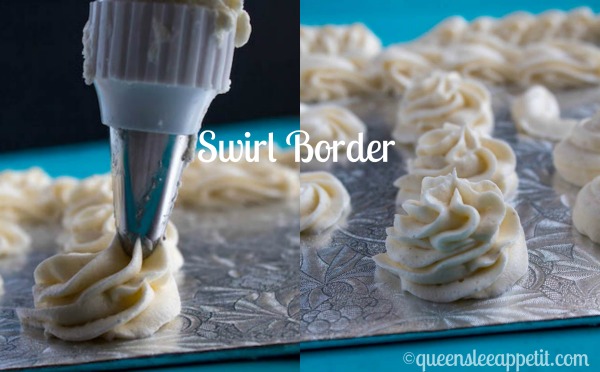
Swirl Border:
- Hold piping bag at a 90 degree angle slightly above cake
- Squeeze out frosting and create a swirl like you would on a cupcake
- Slowly release pressure while lifting bag away.
- Repeat around entire cake.
Wanna practice these borders on a real cake? Try these:
>>Pin Me For Later<<

Cecilia
I Am new to baking , this is very helpful
Angela
Thanks for sharing your piping tips! I look forward to trying something new. I'm a home Baker who sells sweet treats but decorating is not my forte. I would love to step up my game. I also look forward to trying some of your delicious recipes. Your pink champagne cake led me to your blog. Glad I lucked out! Thanks again
Dedra | QueensleeAppetit
Thank you, Angela. I’m glad you found my tips helpful!