
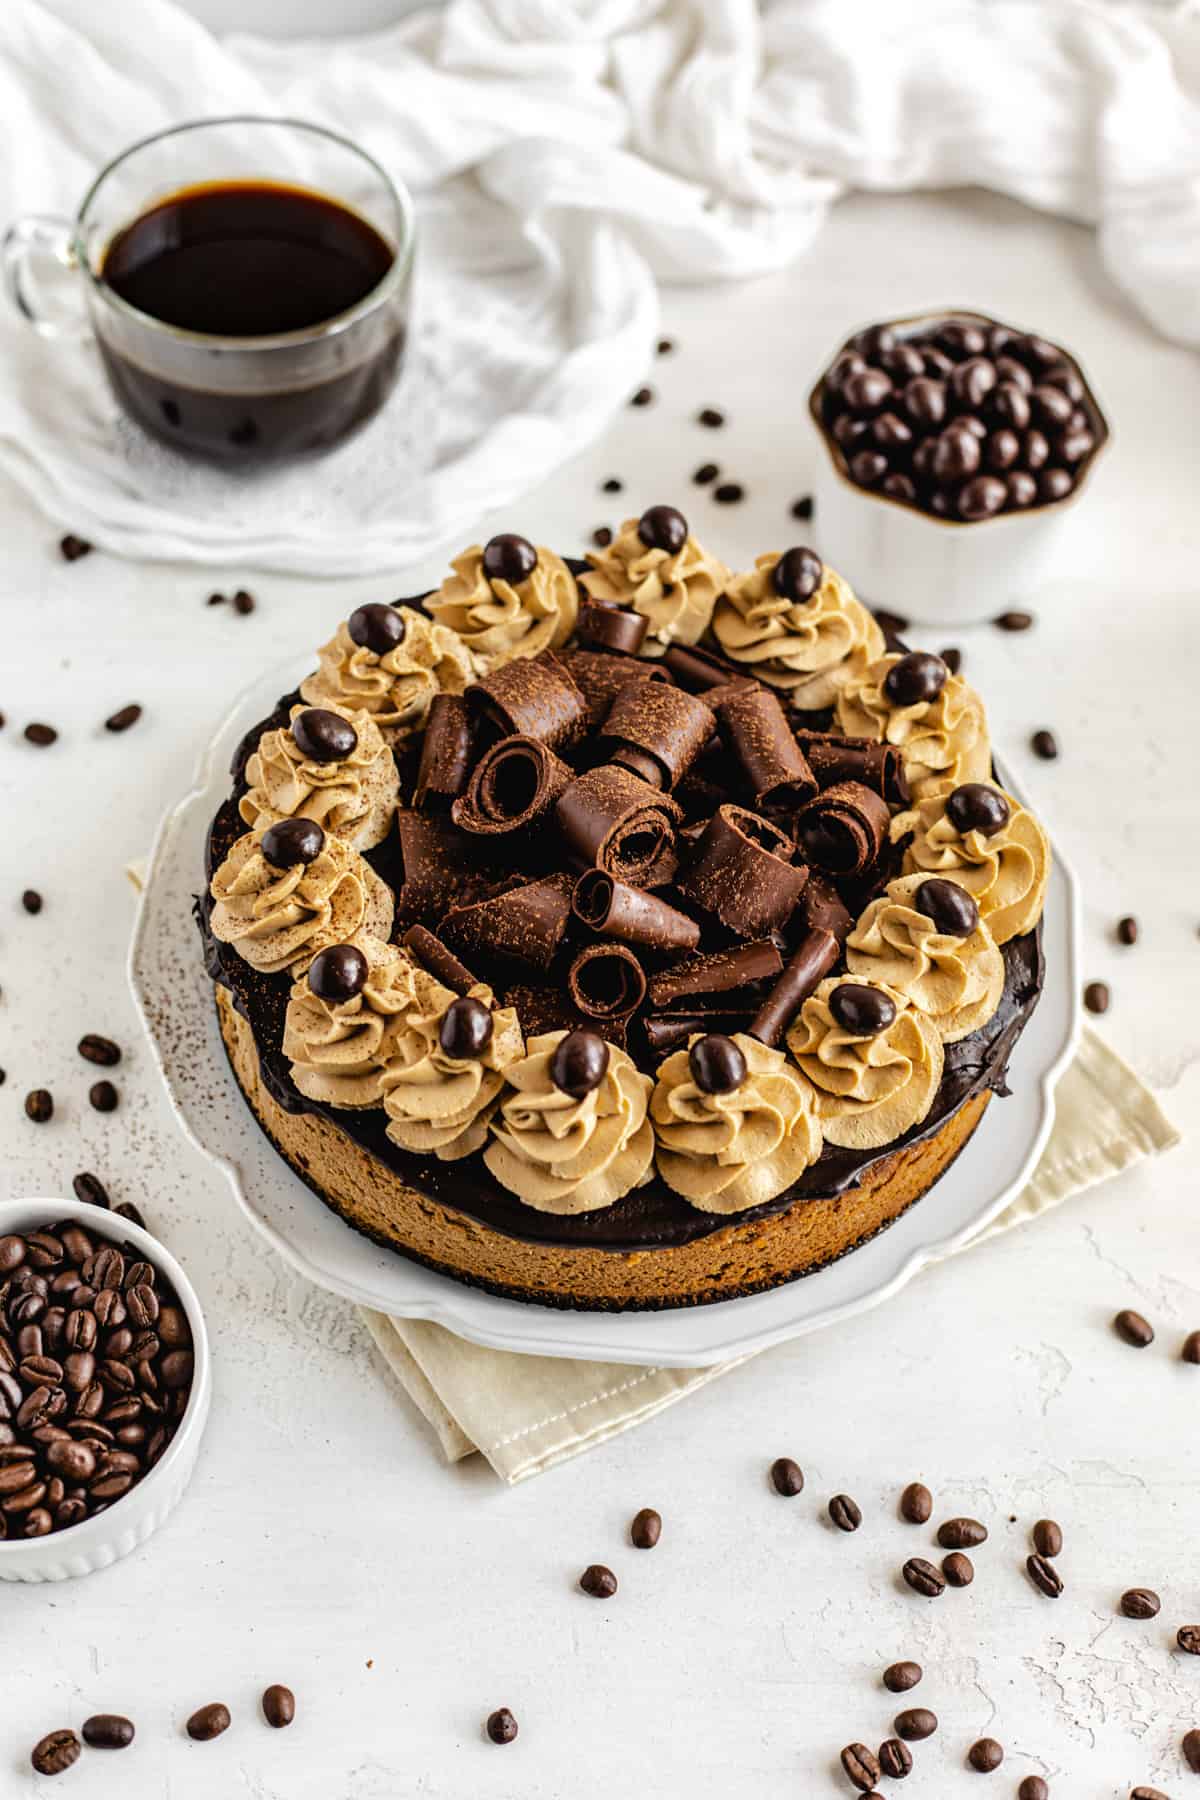
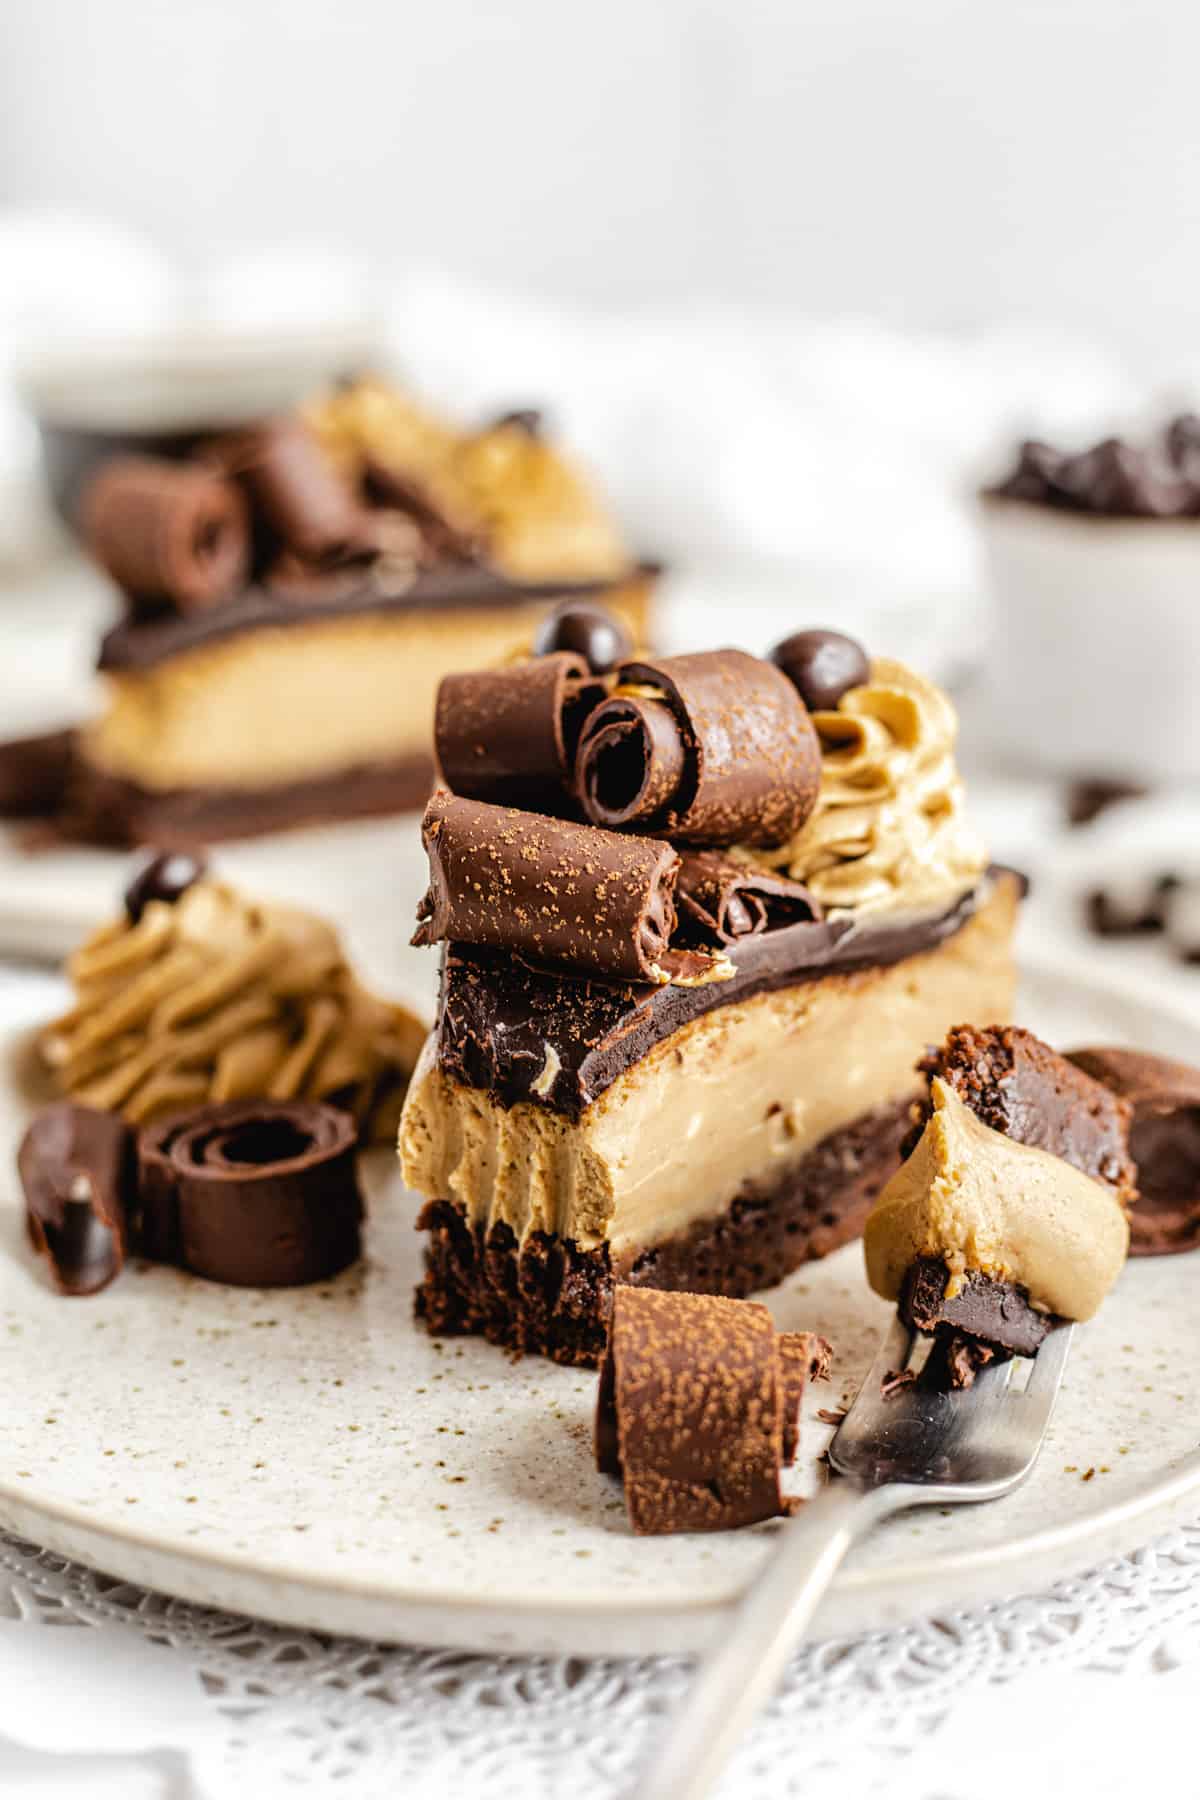
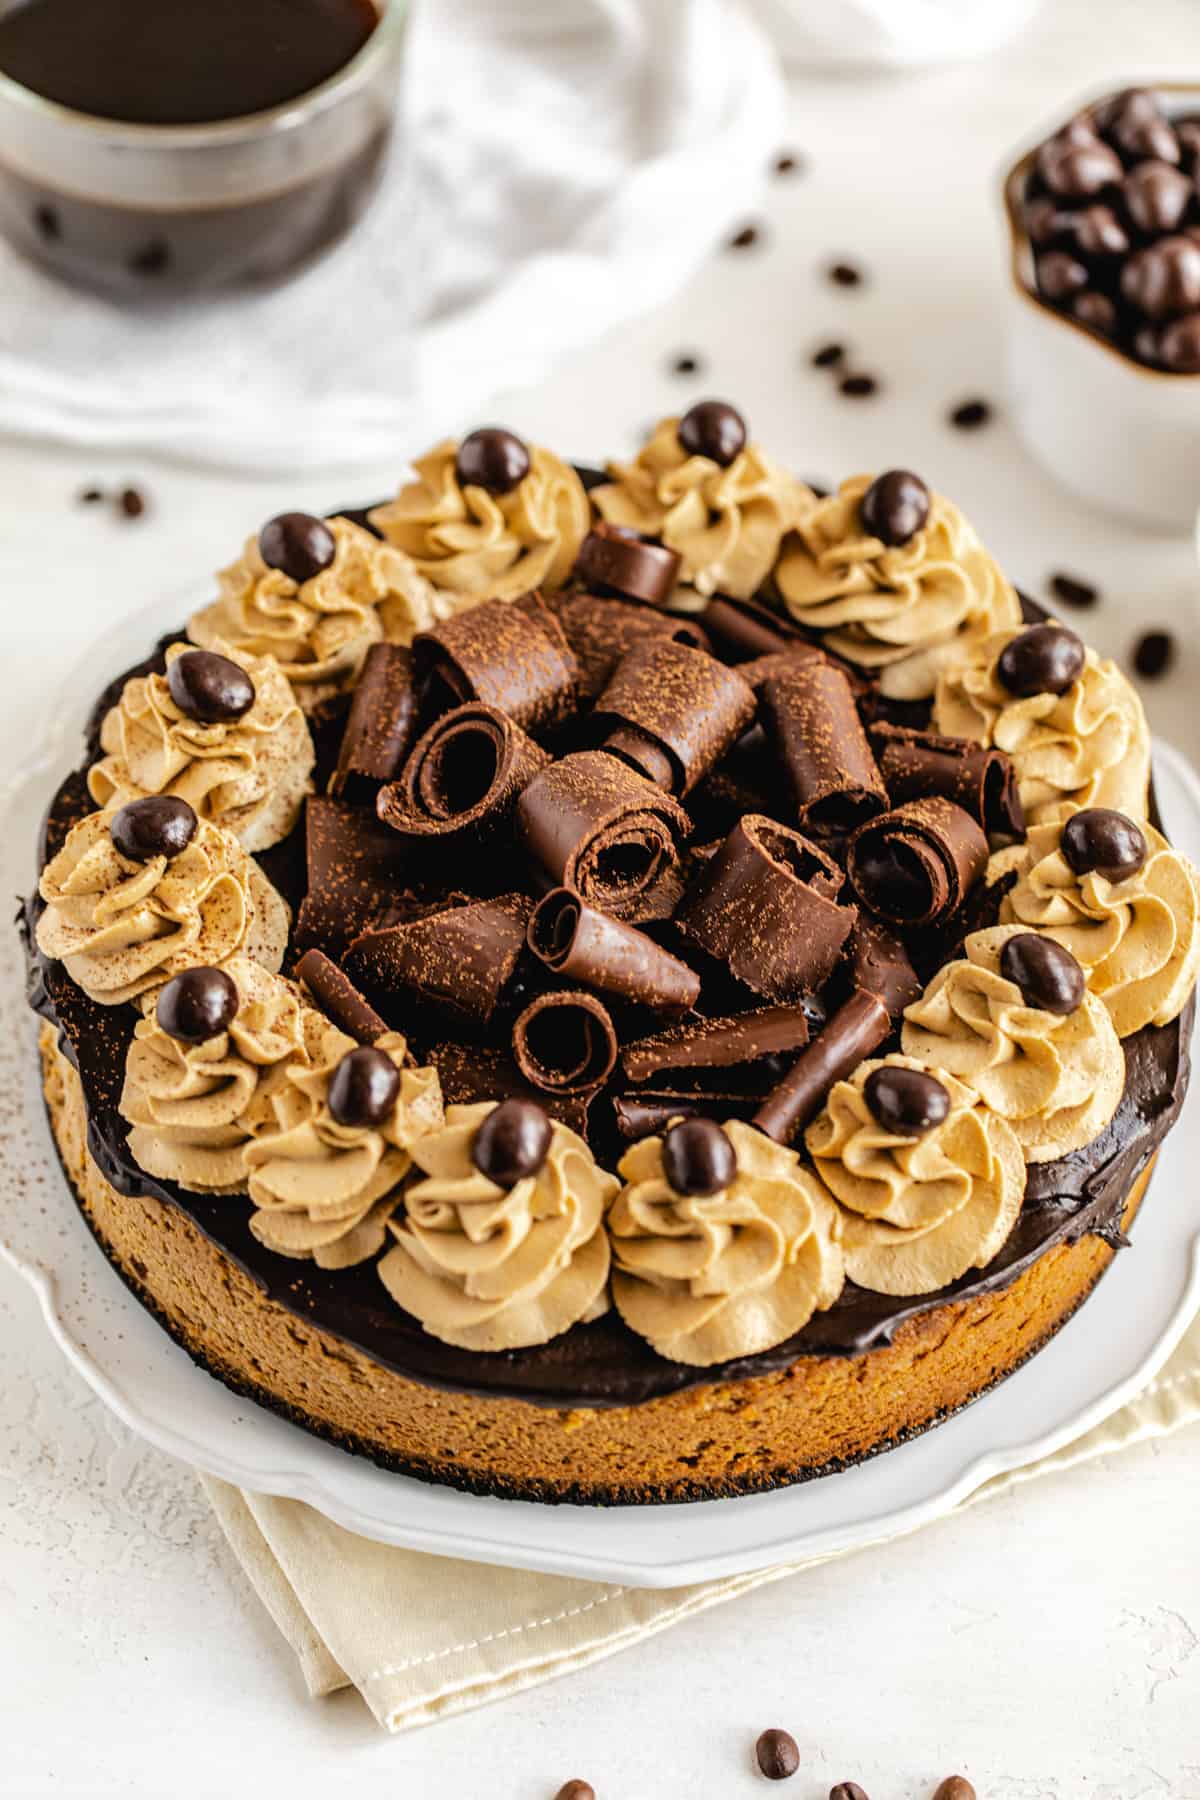
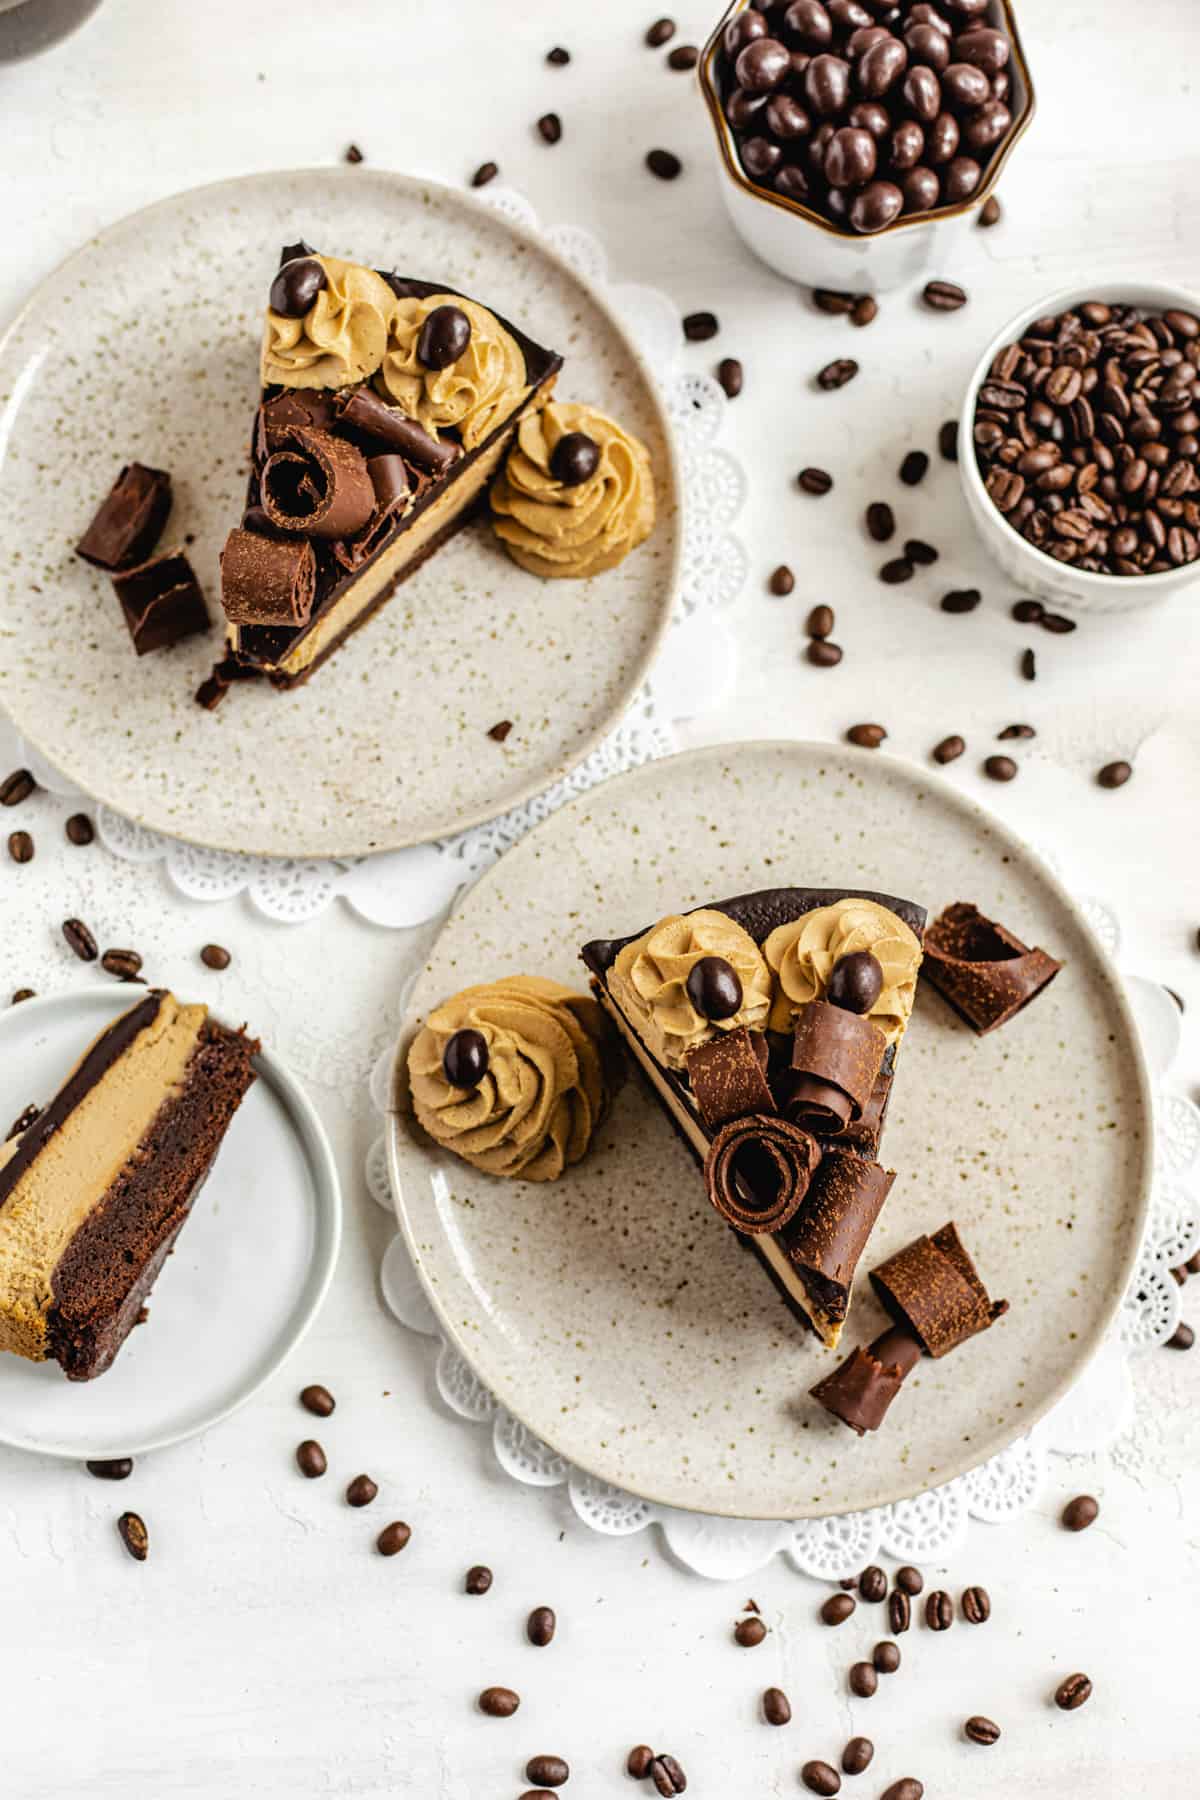
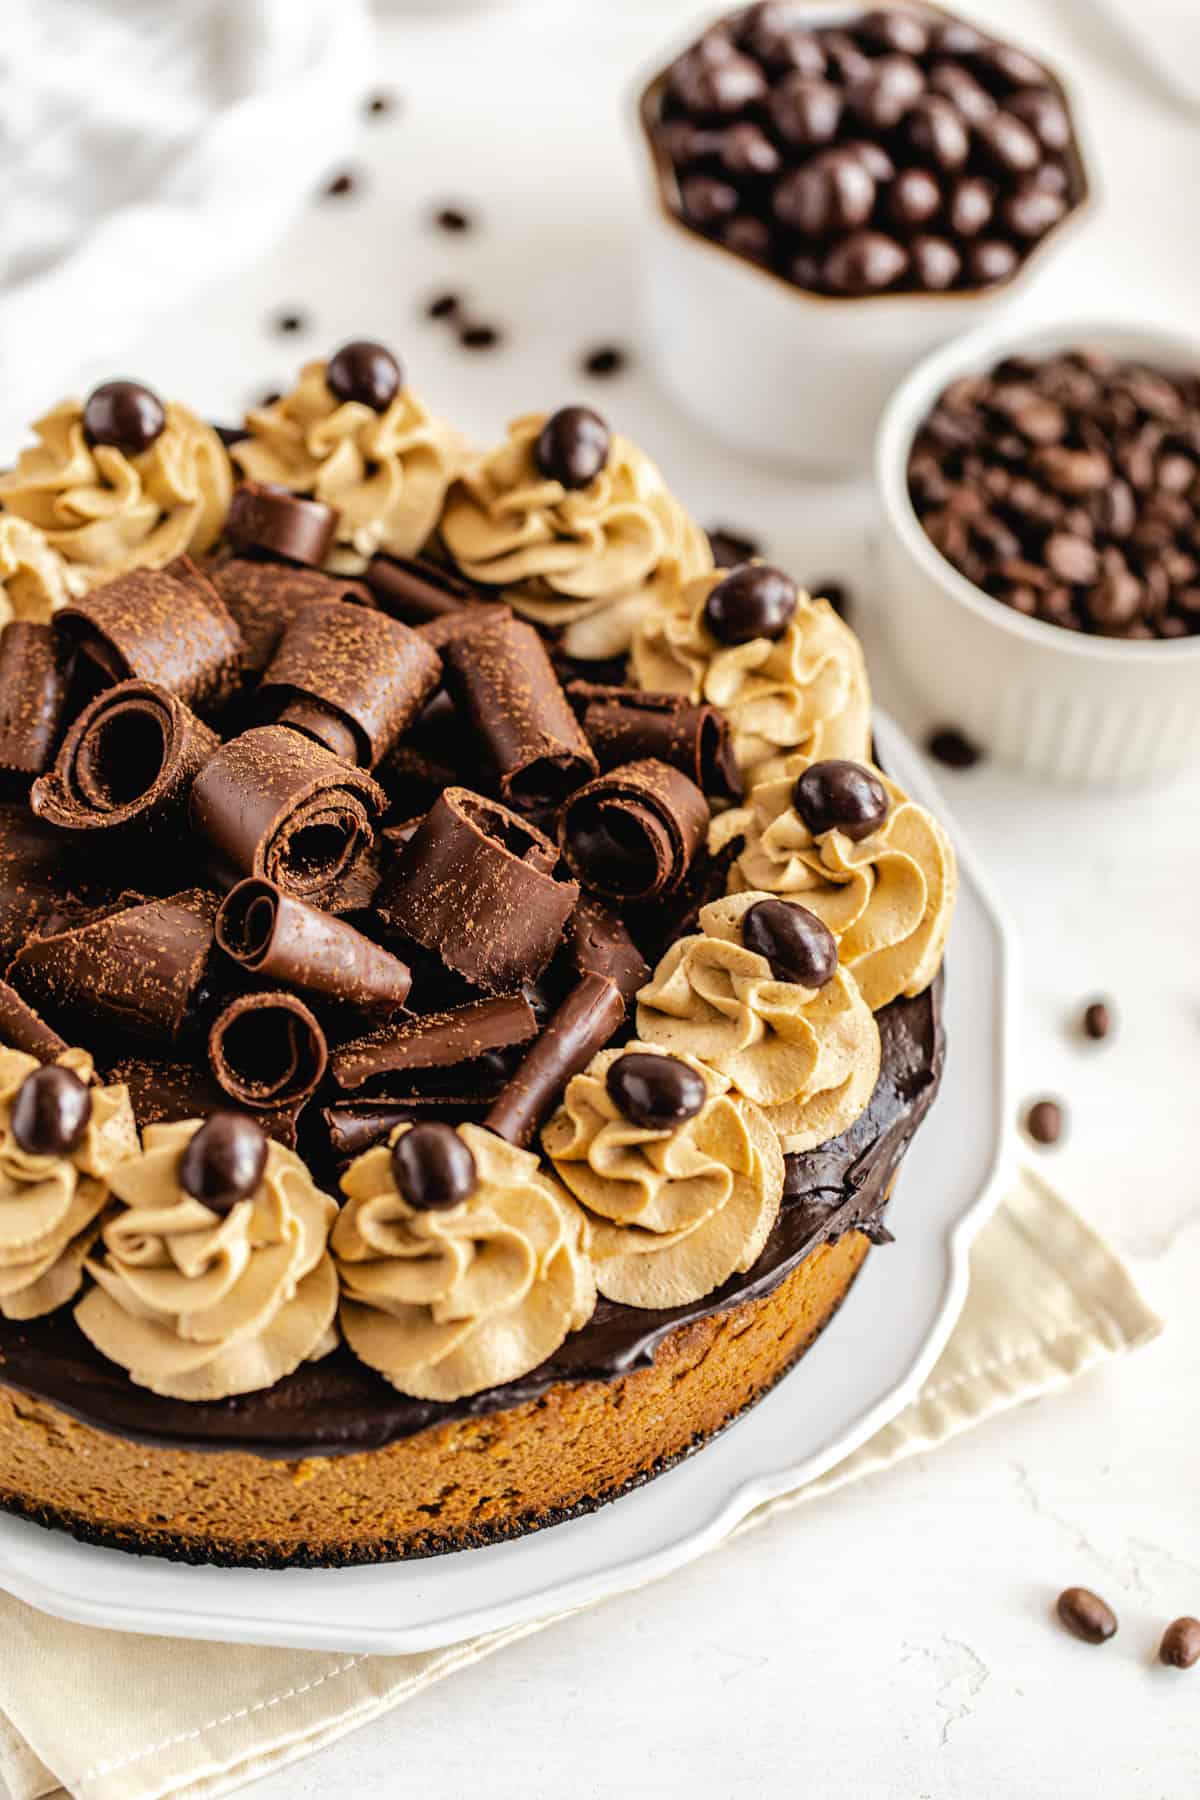
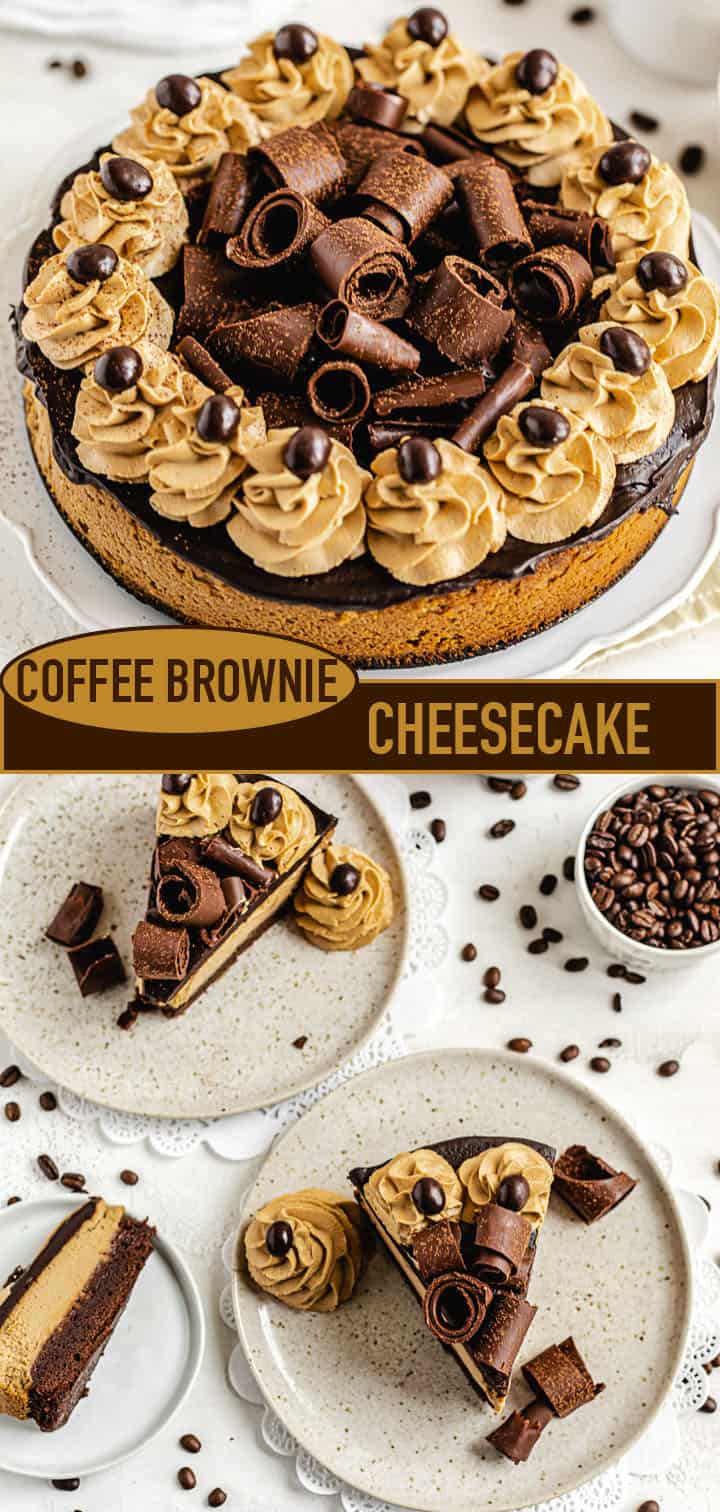
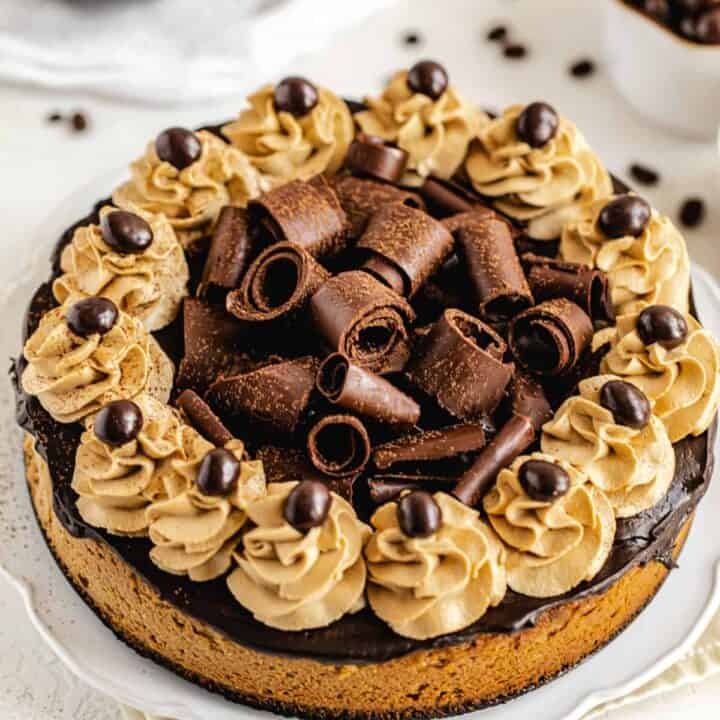
Coffee lover? Brownie lover? Cheesecake lover? Well then welcome to your new addiction! This Coffee Brownie Cheesecake consists of a creamy coffee cheesecake sitting on top of a dense brownie bottom, topped with a rich coffee chocolate ganache, chocolate curls, coffee whipped cream and chocolate covered coffee beans.
This post may contain affiliate links. As an Amazon Associate I earn from qualifying purchases. Please see my full disclosure policy for details.
*Post and Photos Updated: 03/29/2021*
Coffee Brownie Cheesecake
Guys, this is like, the greatest cheesecake I’ve ever made. It’s so rich, creamy, chocolaty and packed with bold coffee flavour — and the brownie base is an added bonus! I’ve never really been a huge fan of the coffee flavour, but after making this Coffee Oreo Nutella Swirl Ice Cream, I realized that coffee, like many things, tastes a MILLION times better in dessert form.
That being said, I didn’t want this cheesecake to be pure coffee, so I had to pair it with another flavour. In my opinion, out of all the flavours in the universe, there’s only one that seems to pair perfectly with all of them: CHOCOLATE!
5 Parts to This Cheesecake
As you can see, the layers alternate between the chocolate and coffee flavour! Here's what you can find in this chocolate/coffee dessert:
- Brownie Base: The brownie base is very simple to make, and only needs around 20-25 minutes to bake. One of the things I love about this brownie base is that it doesn't dry out, thanks to the water bath we bake the cheesecake in!
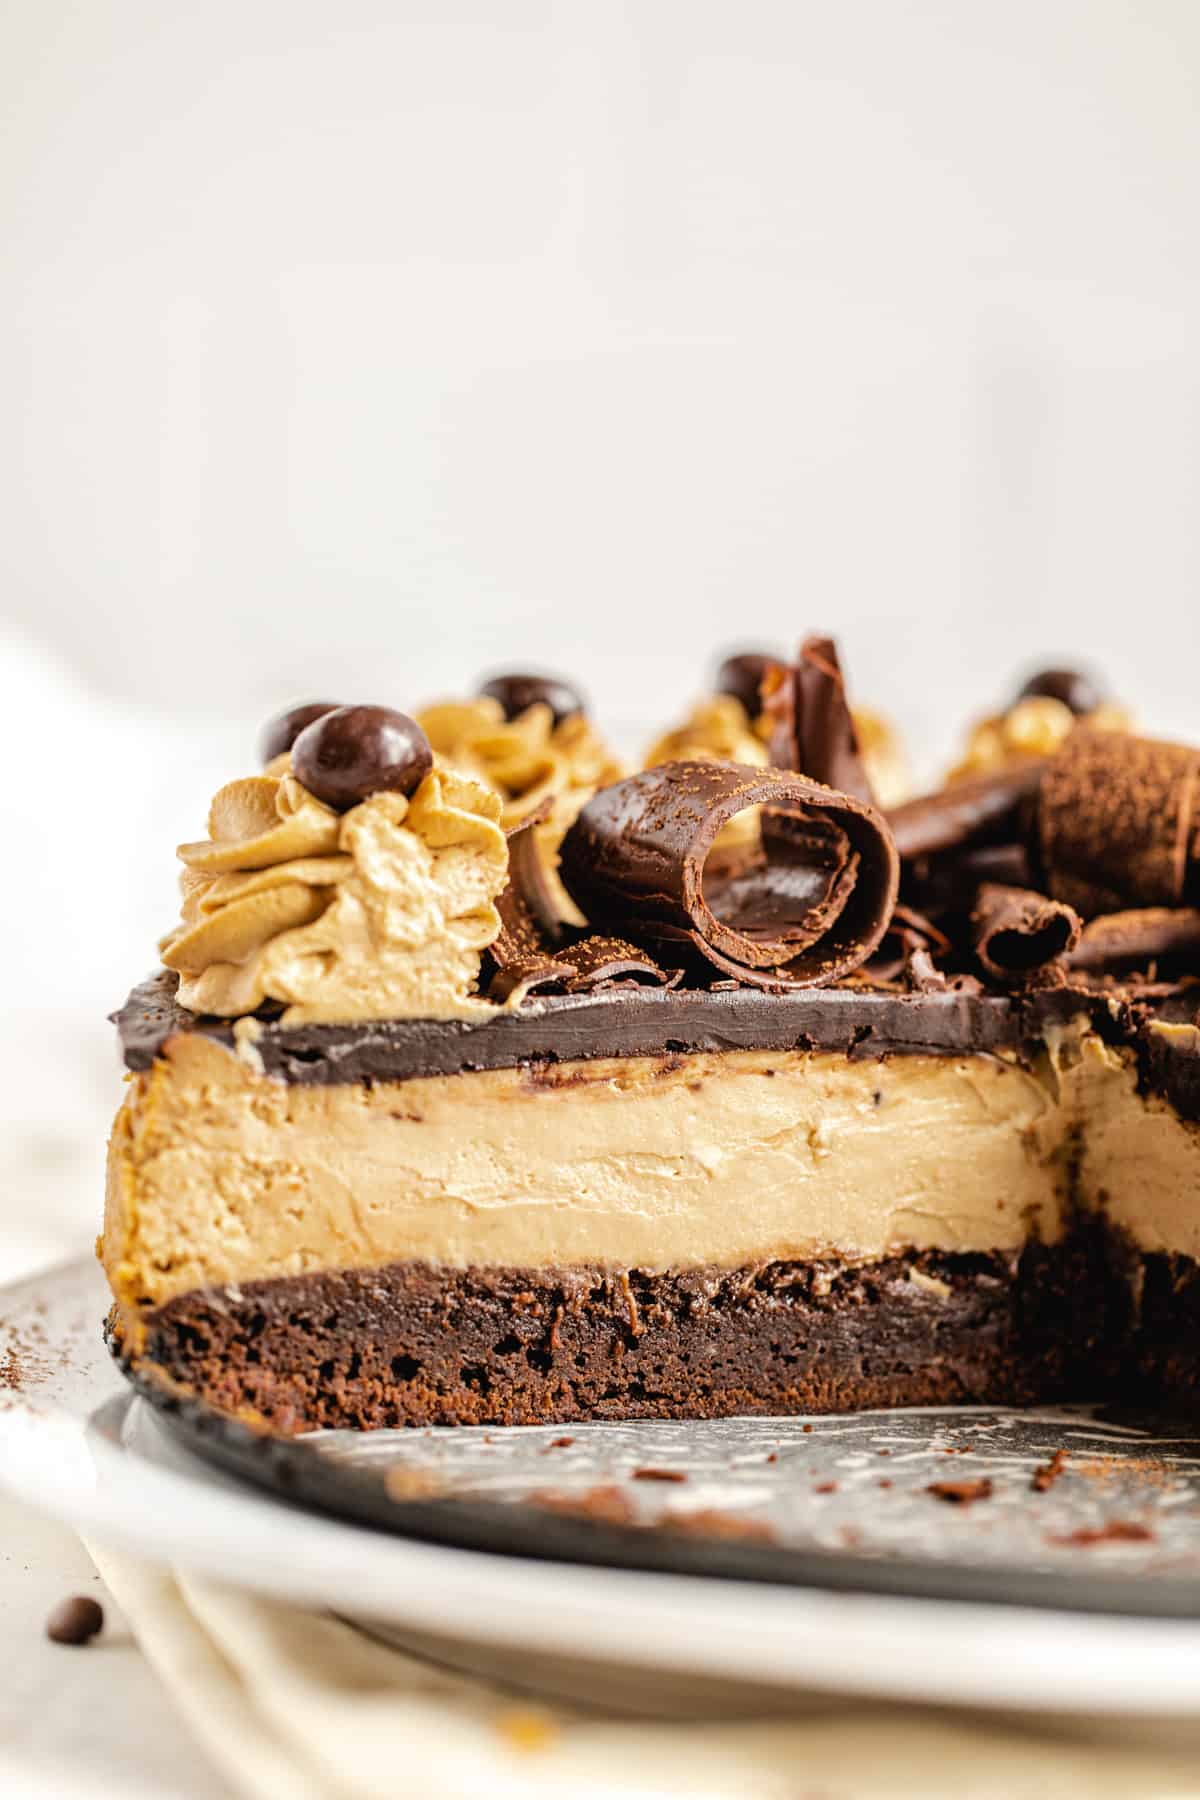
- Coffee Cheesecake: Mmm, a super creamy cheesecake filling that contrasts perfectly with the dense and fudgy brownie base. Combine hot water and coffee to get a strong coffee flavour!
- Mocha Ganache: I think this was a normal 2-ingredient ganache when I first published this recipe. In this upgraded version, we'll be adding some instant coffee to the heated cream before adding it to the chocolate to get a thick and silky mocha ganache!
- Coffee Whipped Cream: only 3-ingredients are needed for this whipped cream. Just like with the ganache, the instant coffee dissolves right into the heavy cream, so all you need to do is whip it up to get a nice fluffy whipped topping!
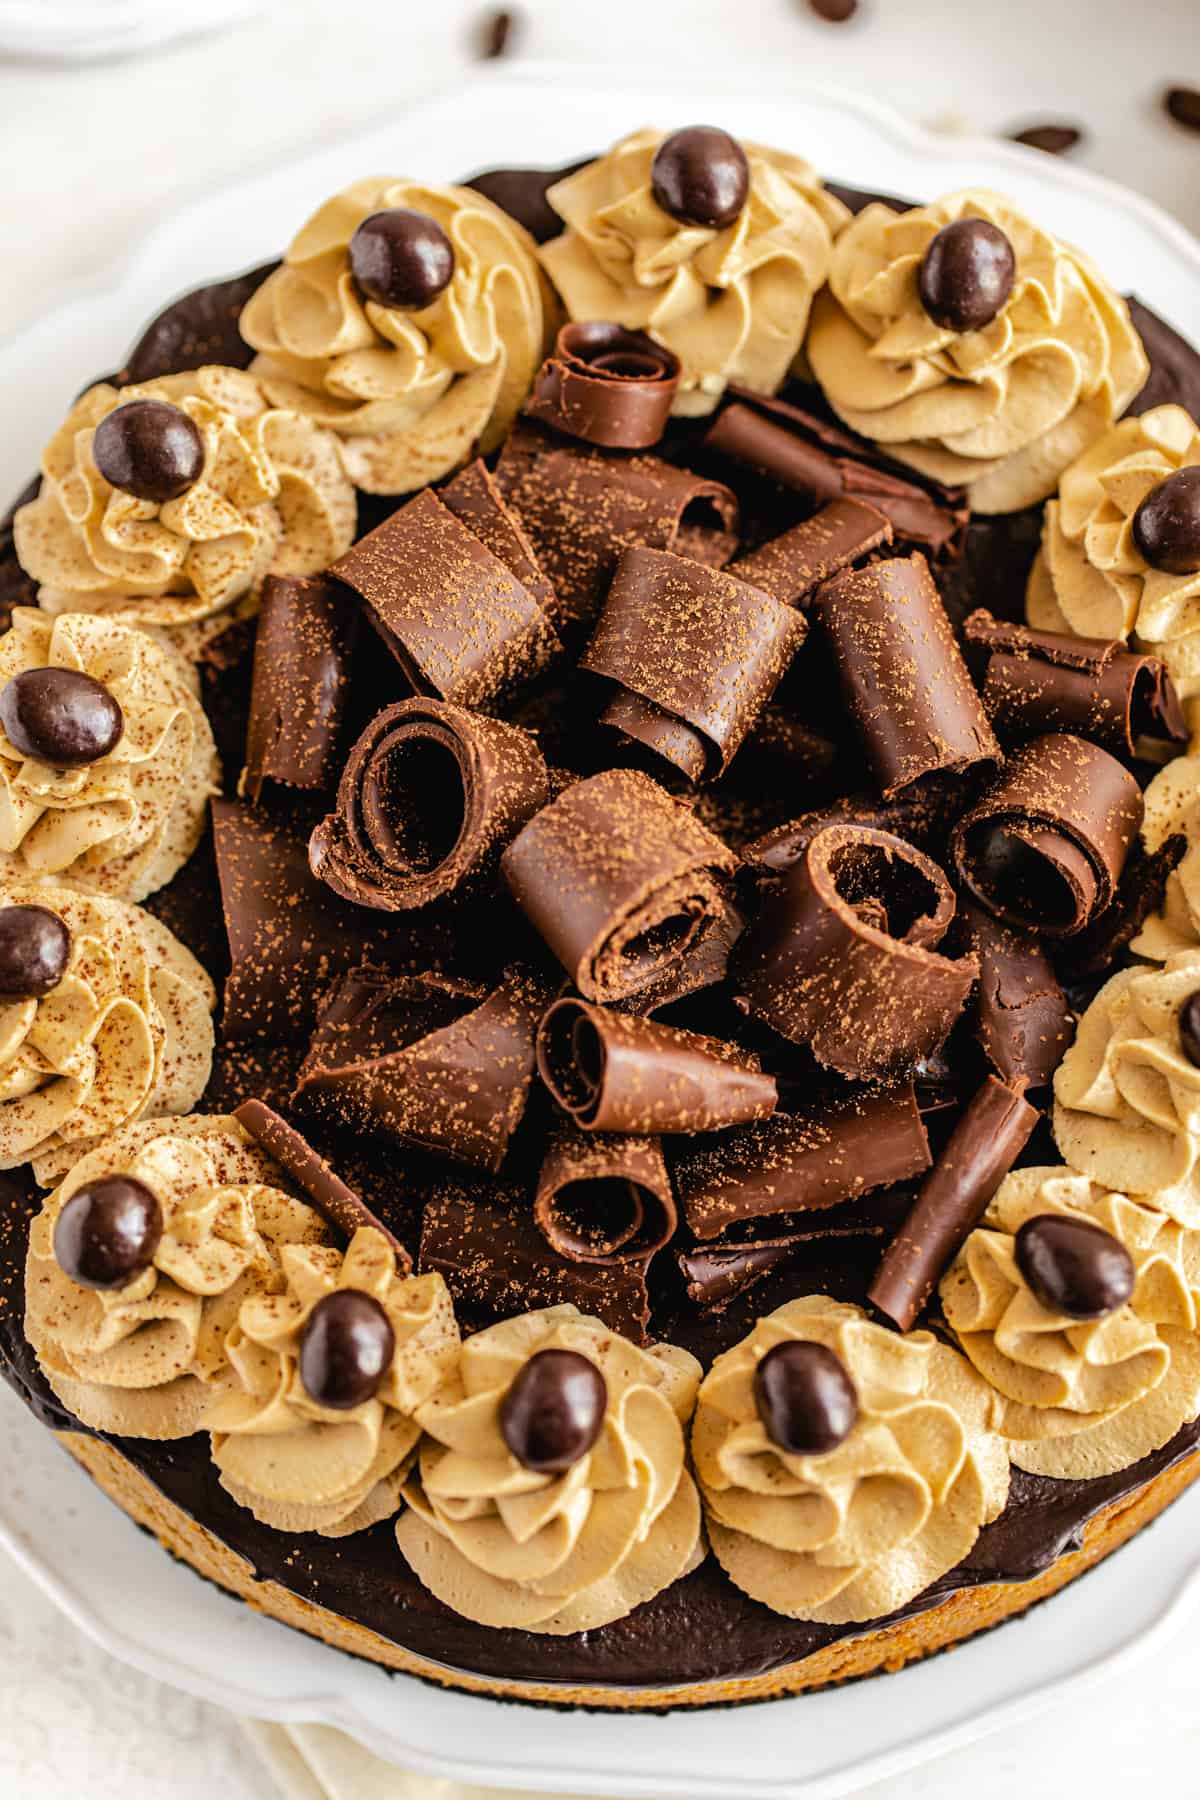
- Chocolate Curls: These can be prepared ahead of time and stored in an airtight container in the refrigerator before placing on the cheesecake.
This is a Cheesecake Factory level cheesecake, so there's quite a bit of work that goes into it. Trust me, though, each layer is very simple to make. Let me walk you through the process!

Brownie Base
Let’s start with the brownie base. This part almost made me scrap the entire idea of making this cheesecake, because the thought of “how the heck am I gonna bake a brownie AND a cheesecake together?!” drove me absolutely insane.
I looked up different brownie cheesecake recipes and some of them baked the brownie and cheesecake at the same time, some of them pre-baked the brownie until it was halfway done, some pre-baked the brownie until it was fully done, and some just baked a brownie and made a no-bake cheesecake to put on top. I considered doing all of these, which is why I kept changing the recipe over and over again going absolutely nuts trying to find the perfect recipe!
In the end, I decided to calm down, take a few deep breaths, and just bake the brownie normally. Although, about a millisecond before I began, I realized that my normal fudgy brownie recipe I use all the time just wasn’t gonna cut it.
Let me explain...
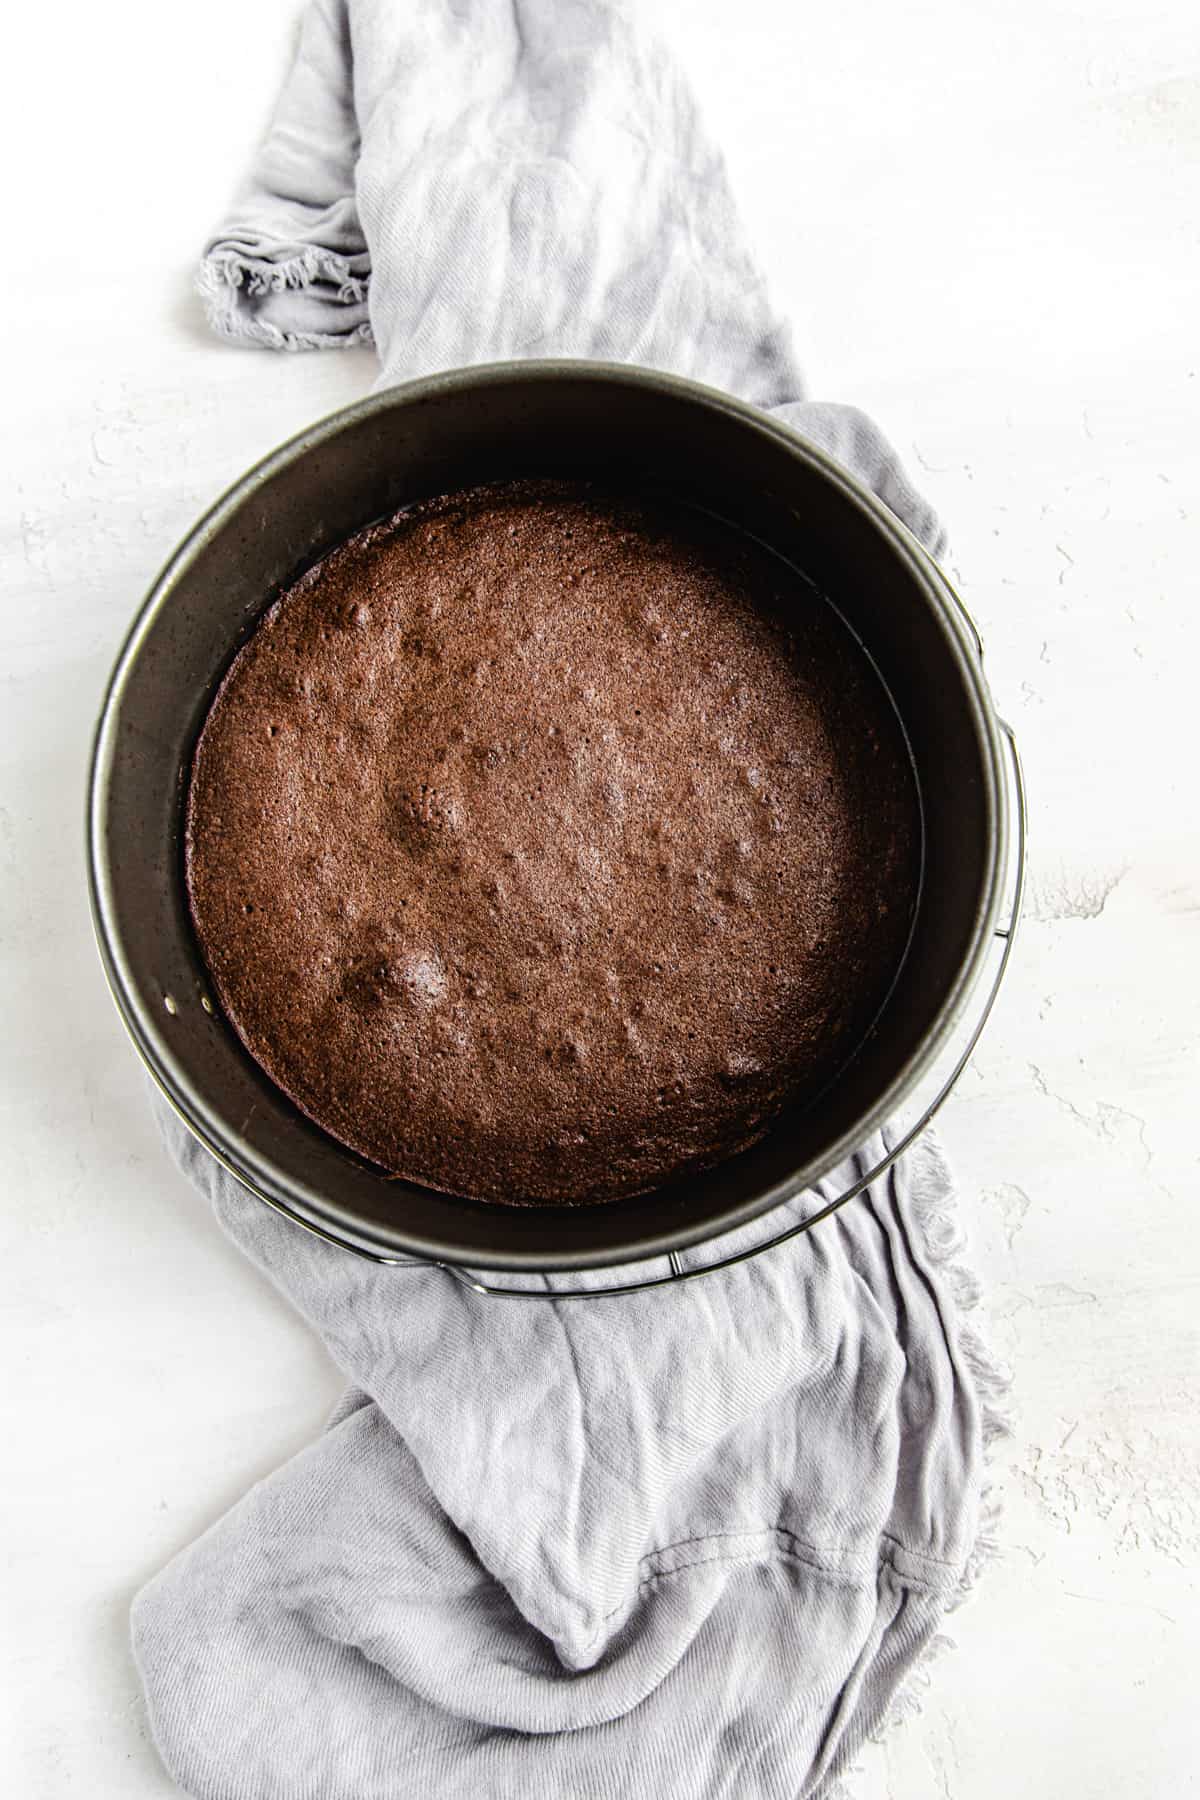
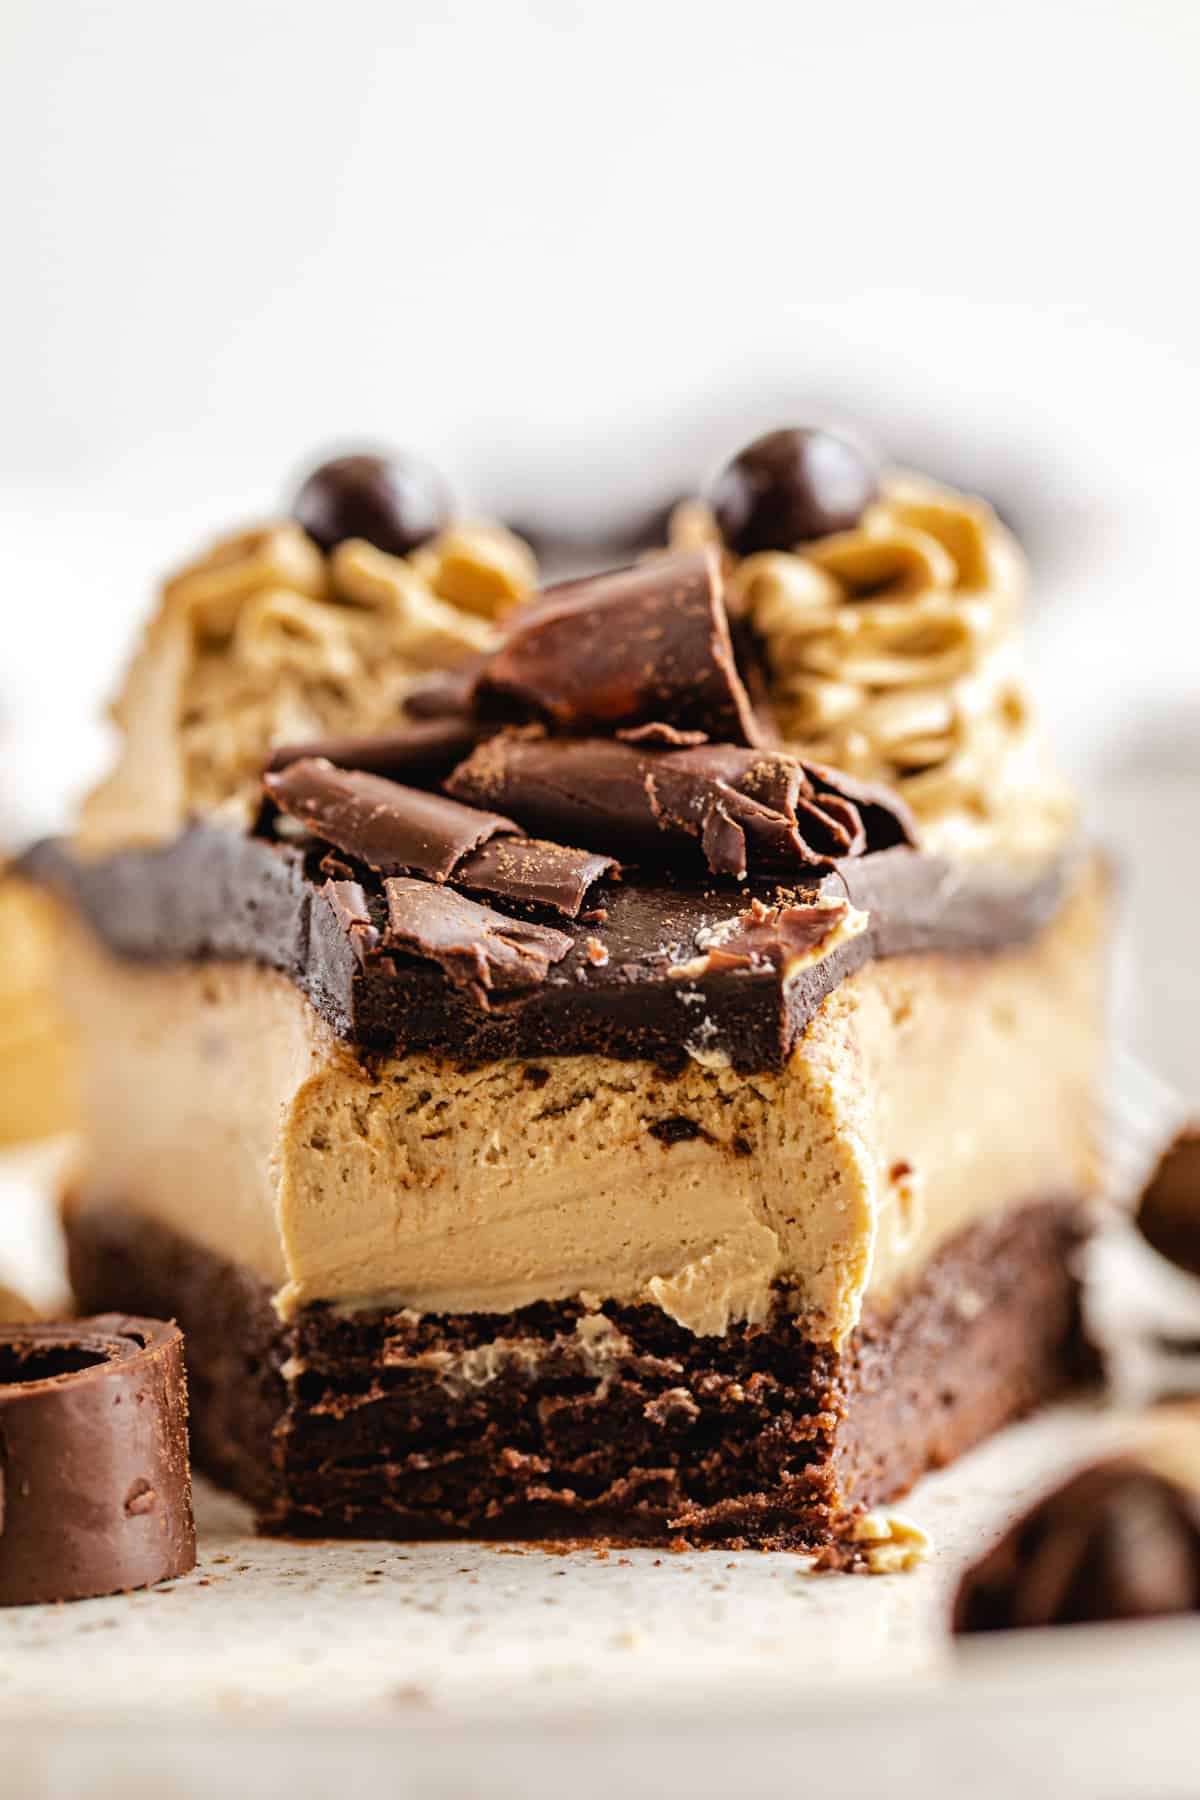
My usual recipe for brownies always uses melted chocolate. I prefer this because it creates the fudgiest, chocolatiest brownie ever! However, once the brownie has been chilled in the refrigerator, it hardens up. This is perfect for getting nice and neat slices, but when it comes to consuming, it’s best when the brownie is at room temperature.
This would’ve been perfectly fine if it wasn’t for the cheesecake which tastes best straight from the refrigerator. I mean, no one really likes warm cheesecake, do they? I sure don’t. On top of that, the different textures between the soft, smooth cheesecake and the dense fudgy brownie bottom would’ve made this cheesecake difficult and messy to cut.
Because of all of these cons, I had to bite the bullet and get rid of the melted chocolate all together and just use cocoa powder. This produced a more cakey brownie, which I don’t really love. Thankfully, it doesn’t harden when in the refrigerator, and when paired with the cheesecake, the “cakeyness” of the brownie doesn’t bother me at all. The textures melt together perfectly in your mouth!
Coffee Cheesecake Filling
The cheesecake filling is super smooth and creamy, just the way I like it. It gets its coffee flavour from the 2 tablespoons of instant coffee granules that I mixed with hot water. We also add a bit of vanilla to boost the flavours.
Once the brownie has finished baking, pour the cheesecake filling directly on top. I usually tap the pan to get all the air bubbles out, but it was way too full and would’ve made a mess, so I recommend getting the air bubbles out while the batter is still in the bowl, then pour it onto the brownie.
How to Prevent Waterbath from Leaking
Here’s another thing I couldn’t stop stressing about — the waterbath. We all hate it, but it’s necessary to prevent the cheesecake from cracking (although the cornstarch and low baking temperature also help with that).
Aside from crack prevention, water baths also keep the cheesecake from drying and browning on the top. It also plays a part in making cheesecakes super creamy!
Now here’s my problem, every time I’ve used a water bath in the past, it always leaked through and make my crust soggy. This was never really a huge deal to me because they were cookie crusts, and if they didn’t set up in the fridge like they usually do, I could easily scrape the soggy part off.
Unfortunately, the same can’t be said for a brownie crust. If water got into the pan and onto the brownie, it’s just ruined and I don’t think there’s anyway to fix it. Watery brownies are far from appetizing so you want to be 1000% sure no water leaks into the pan.
But don’t fret, I have a few solutions!
- Leakproof pan: the best way to prevent waterbaths from leaking into your pan? Use a leak-proof springform pan! This is the obvious solution.
- Large Heavy Duty Aluminum Foil: if you’re anything like me, you don’t have the time or money to be going out to buy a leakproof pan. I definitely want to get one in the future, but for now this is a great alternative. One of the things I used to do when preparing my pan is using 2 long pieces of aluminum foil and crossing them. This never works. It always leaks. I recommend getting one of those LONG and LARGE pieces of aluminum foil so you only need one piece to wrap around your entire pan, along with a few extra layers to be safe. This ensures that there’s absolutely no crevice for any water to sneak in.
- Slightly larger Pot or Cake Pan: I was in the middle of using the solution above until my eyes landed on a beautiful 10 or 11-inch pot in my cupboard. I put my 9-inch springform pan inside and it fit PERFECTLY! In my opinion this is hands down the BEST way to prevent leaking because that water won’t be able to get to your beautiful crust no matter how hard it tried. It’s best to use a pan that’s only a bit larger than your springform pan because you still want the waterbath to be close to your cheesecake so it can do its thing. I put the pot my springform pan was sitting in, into a larger rectangle cake pan and poured in that boiling water with all the confidence in the world because I knew that water would stay where it should be.
So go look in your cupboards and place your springform pan in each pot or cake pan until you find the perfect size! I recommend doing this with every cheesecake you make, and you’ll never have to deal with a soggy crust ever again!
Mocha Ganache
Once you’re cheesecake is baked and beautiful, you’re gonna wanna prepare the toppings while it cools. First off is the mocha ganache.
This is a very basic ganache recipe using chocolate and heavy cream. I was planning on making this a chocolate-only ganache, but made the last minute decision to add some coffee flavour just to see how it would taste.
Boy, am I glad I did. The coffee flavoured ganache topping is one of my favourite parts of this cheesecake! I added some instant coffee granules to the heavy cream and heated it until the granules dissolved, then poured the coffee cream onto the chocolate and stirred to make a silky ganache.
While the cheesecake was still cooling, I poured the ganache on top and placed the entire thing in the refrigerator to chill overnight. If you want the ganache to drip over the sides, then save this part for last and just pour the cooled ganache over the chilled cheesecake after removing it from the springform pan.
Chocolate Curls
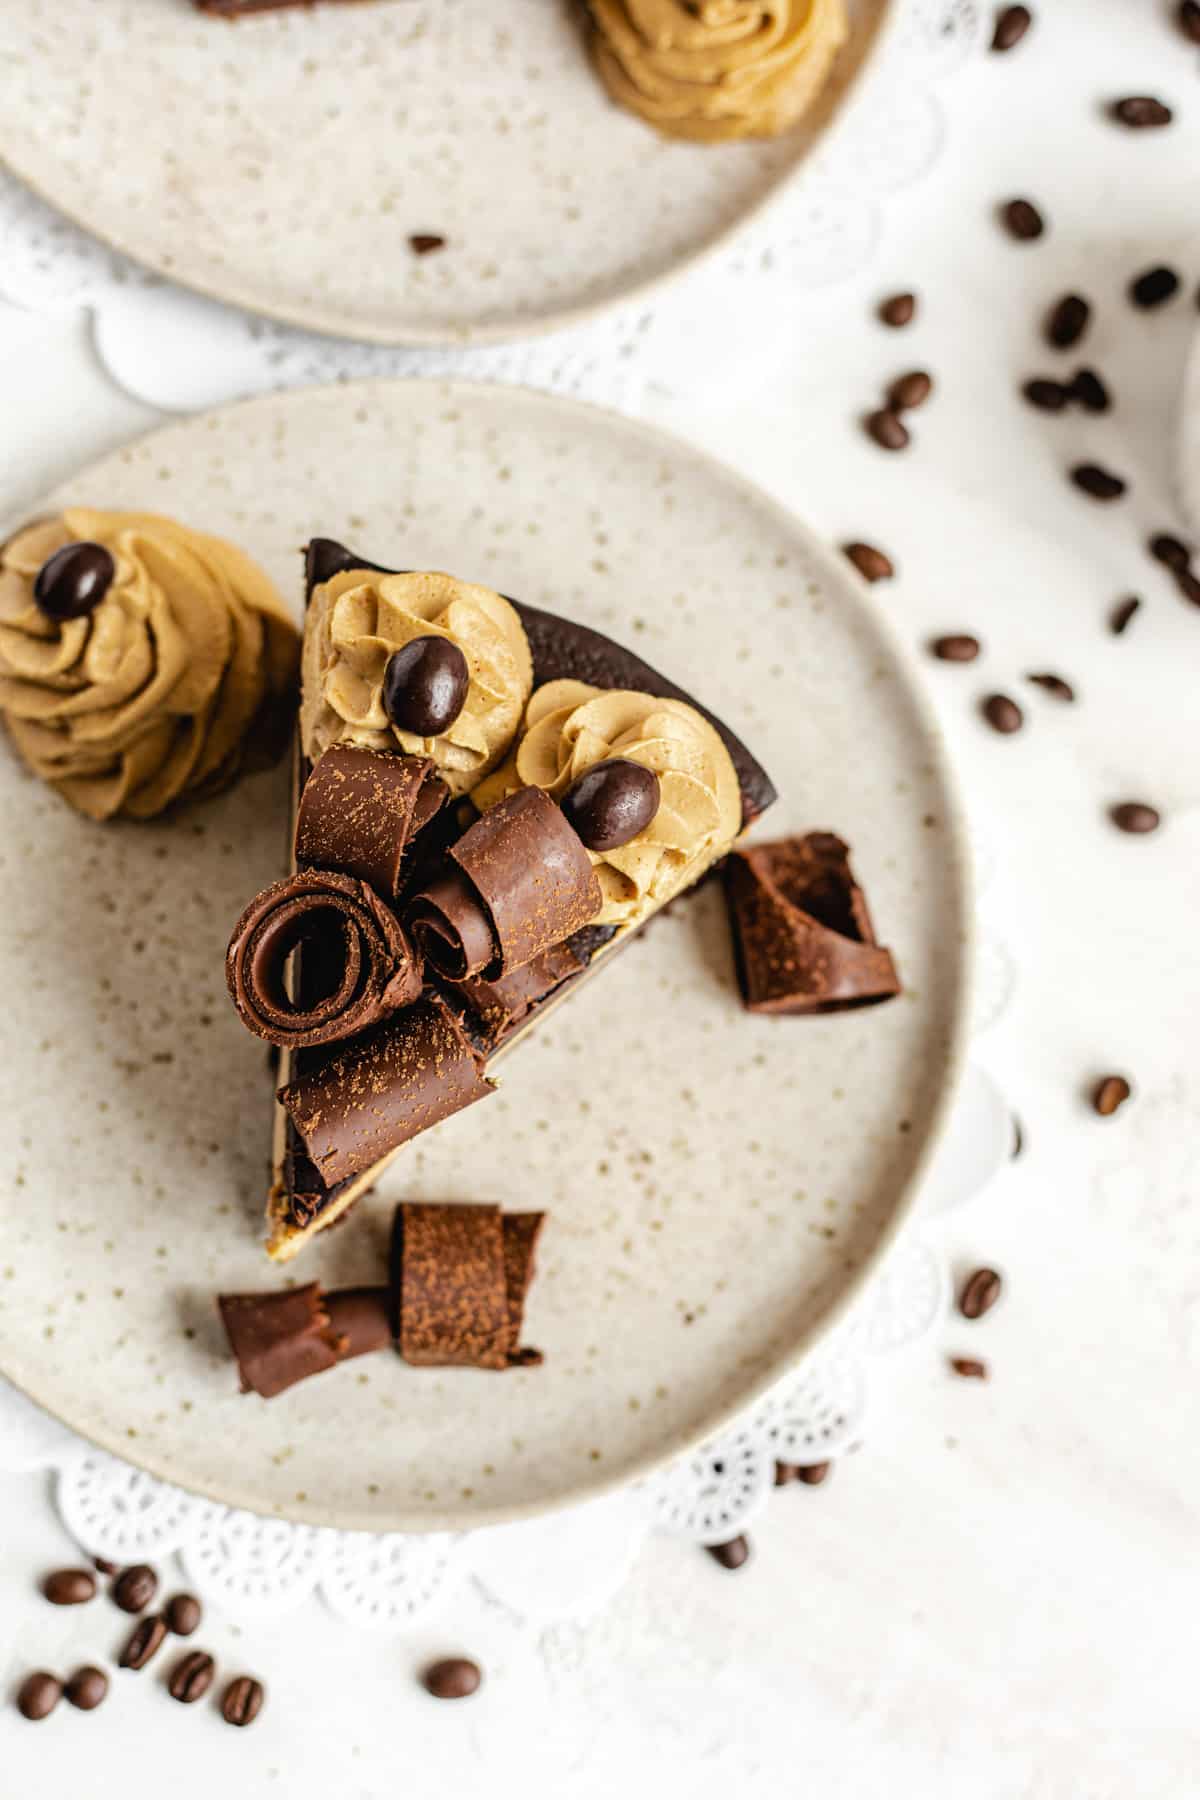
Guys, I’m so sorry. I went crazy with this cheesecake, but I just had to add these big chocolate curls in the middle. This is really something you’d buy at the Cheesecake Factory just to eat one slice and lowkey regret it until you go for another one a few days later. You can totally skip this part if you want, but if your a psychotic sweet tooth like me, pile them on!
This recipe is a bit tricky. I mean the part where you melt the chocolate and spread it on the back of a clean baking sheet is very easy. However, you need to chill it for a specific amount of time so when you go to make the curls, the chocolate will curl into itself. If it's too cold, you'll end up with shards. If it's too soft, you'll just end up with globs of chocolate. Because of this, the baking sheet will spend a lot of time popping in and out of the refrigerator while you work.
Want a simpler solution? Take a large chocolate bar and shave it with a potato peeler. They won't look as big and beautiful as these, but they'll still make a great garnish!
Coffee Whipped Cream
Every good cheesecake needs a whipped cream topping, so I topped mine with a light coffee flavoured whipped cream. Only 3 ingredients are needed: heavy whipping cream, instant coffee granules and powdered sugar. Simply beat all those ingredients together using a hand mixer until it’s stiff and fluffy.
I used a Wilton 1M tip to pipe a swirl border around the edges, then I dusted the entire top of the cheesecake with cocoa powder.
Finally, to finish the cheesecake off, I topped each whipped cream swirl with a chocolate covered coffee bean. You couldn’t catch me dead eating one of these but they look gorgeous and really add a lot to this cheesecake!
Wow this post ended up being way, way, way longer than I expected. But there’s so much going on in this cheesecake, which gave me a great excuse to go on and on about it. It’s seriously delicious!
A creamy, rich cheesecake that combines the bold flavour of coffee and the sweetness of chocolate. It’s packed with incredible flavours and textures in every bite and is sure to satisfy your coffee and cheesecake cravings, or make you crave it more!
SHARE YOUR PICS!
Follow me on Instagram and tag #queensleeappetit so I can see and share all of your Queenslee Appétit creations in my stories and the QA Newsletter!
>>PIN ME FOR LATER<<
FOLLOW QUEENSLEE APPÉTIT
Like what you see? Make sure you‘re following Queenslee Appétit for more tasty recipes!
Pinterest | Instagram | Facebook |
Have any questions about the recipe? Contact me here, and I’ll be happy to help!
SWEETEN UP YOUR INBOX!
SUBSCRIBE to the Queenslee Appétit Newsletter to recieve new recipe notifications, monthly baking tips, sneak peeks to upcoming recipes, exclusive recipes and more!
Let’s get baking!
Coffee Brownie Cheesecake
This Coffee Brownie Cheesecake consists of a creamy coffee cheesecake sitting on top of a dense brownie bottom, topped with a rich coffee chocolate ganache, chocolate curls, coffee whipped cream and chocolate covered coffee beans.
Ingredients
Brownie Base:
- ¾ cup unsalted butter, cubed
- ¾ cup granulated sugar
- ½ cup light brown sugar, packed
- 2 large eggs, room temperature
- 1 large egg yolk
- 1 and ½ teaspoon pure vanilla extract
- ¾ cup all-purpose flour
- ½ cup unsweetened cocoa powder
- ¼ teaspoon salt
Coffee Cheesecake:
- 3 (8 ounce) packages (24 oz) cream cheese, room temperature
- 1 cup granulated sugar
- 1 tablespoon cornstarch
- 2 tablespoon instant coffee granules
- 2 tablespoon hot water
- 2 teaspoon pure vanilla extract
- ½ cup sour cream, room temperature
- ½ cup heavy cream, room temperature
- 3 large eggs, room temperature
- 1 large egg yolk
Chocolate Coffee Ganache:
- 1 and ½ cups dark chocolate chips
- ½ cup heavy cream
- 2 tablespoon instant coffee granules
Chocolate Curls:
- 5 oz. dark chocolate, chopped
- 1 tablespoon vegetable shortening
Coffee Whipped Cream:
- 1 cup heavy cream, cold
- 1 tablespoon instant coffee granules
- 6 tablespoon powdered sugar
Optional Garnishes:
- Chocolate covered coffee beans
- Cocoa Powder, for dusting
Instructions
For the Brownie Base:
- Preheat the oven to 350°F (180°C). Line the bottom of a 9-inch springform pan with parchment paper, and spray the sides with non-stick spray. Set aside.
- Place cubed butter in a medium heat-safe mixing bowl over a saucepan of simmering water. Stir constantly until the butter is completely melted.
- Remove bowl from heat and immediately add both sugars. Whisk until sugar is dissolved and mixture is smooth.
- Add eggs, egg yolk and vanilla and slowly whisk until combined. Do not overmix. Sift in flour, cocoa, and salt and stir with a rubber spatula until well blended.
- Pour the batter into the prepared pan and spread into an even layer. Bake for 20-25 minutes or until a toothpick inserted into the brownie comes out with a few moist crumbs. Allow to cool completely in the pan on a wire rack. Lower the oven temperature to 300°F.
For the Coffee Cheesecake:
- Take 1 extra large piece of aluminum foil that’s bigger than your springform pan. Place springform pan in the centre and fold aluminum up to the sides to cover the outside of the pan. This ensures that no water seeps into the pan during the water bath. Alternatively, I placed my pan in a slightly larger pot to completely protect my crust from the water.
- In the bowl of an electric mixer fitted with the paddle attachment, or in a large bowl using a handheld mixer, beat the cream cheese on medium-low speed until creamy, about 2-4 minutes.
- Scrape down the sides of the bowl and add sugar and cornstarch. Beat until smooth and combined.
- Add the instant coffee to the hot water and stir until dissolved. Add to the mixing bowl along with the vanilla, sour cream and heavy cream. Continue beating until smooth.
- Scrape down the sides and bottom of the bowl and continue to mix until everything is combined.
- Add eggs and yolk one at a time, mixing slowly until just combined, do not overbeat. Scrape sides and bottom of the bowl with a rubber spatula to make sure everything is combined.
- Pour the cheesecake onto the cooled brownie base and place into a larger pan.
- Bring a few cups of water to a boil and carefully pour into the larger pan. The water should only be a few inches up the sides of the pan. Do not go over the top.
- Bake at 300°F for about 1 hour and 15 minutes. The cheesecake is done when the edges are set and the center jiggles just slightly.
- Turn off oven and leave the cheesecake to cool for 30 minutes. After 30 minutes, crack the door open and continue cooling the cheesecake for another 30 minutes. This helps prevent cracking.
- After an hour, remove cheesecake from waterbath and aluminum foil. Run a knife around the edge of the pan so it's not sticking to the sides and allow to cool completely on a rack.
For the Chocolate Coffee Ganache:
- Put the chocolate chips into a medium bowl. Set aside.
- Heat the heavy whipping cream in a small saucepan until it just begins to boil.
- Remove hot cream from heat and add the instant coffee granules. Stir until the granules are dissolved.
- Pour it over the chocolate chips. Cover the bowl and allow it to sit for 5 minutes.
- Remove cover and stir ganache until smooth. If the chocolate chips don’t melt, microwave ganache in 15 second intervals, stirring after each until smooth and combined.
- Pour ganache over cooled cheesecake. Refrigerate cheesecake until firm and chilled, about 8 hours or overnight.
For the Chocolate Curls:
- Combine the chopped chocolate and shortening in a small heat-safe bowl. Microwave in 30 second intervals, stirring after each until melted and smooth.
- Pour the chocolate onto the back of a clean baking sheet and spread into an even layer over the entire sheet. Transfer to refrigerator to set for about 10-15 minutes.
- Remove from refrigerator and use a bench scraper to push into the chocolate and create curls. Place the pieces into a separate bowl or container and refrigerate until ready to use.
For the Coffee Whipped Cream:
- The next day: Add all of the ingredients to a medium stainless steel bowl and beat, using a hand mixer until stiff peaks form, about 3-4 minutes.
Decoration:
- Once chilled, remove cheesecake from refrigerator and remove the springform pan ring. Transfer cheesecake to a serving platter.
- Transfer whipped cream to a pastry bag fitted with a large star tip, I used Wilton 1M. Pipe a border around the top of the cheesecake.
- Garnish the centre with chocolate curls and dust the top of the cheesecake with cocoa powder. Place a chocolate covered coffee bean on top of each whipped cream swirl. Slice and serve!
Notes
- Storage: Store leftovers in the refrigerator for up to one week.
- Chocolate Curls: The chocolate will need to be at the right temperature to create a nice curl. If it's too hard, you'll get shards. Let it sit for 2 minutes before trying again. If it gets too soft while scraping the curls, pop the baking sheet back into the refrigerator for another 5 minutes before continuing. Store chocolate curls in an airtight container when not using.
Nutrition Information:
Yield: 12 Serving Size: 1Amount Per Serving: Calories: 657Total Fat: 40gSaturated Fat: 23gTrans Fat: 1gUnsaturated Fat: 13gCholesterol: 225mgSodium: 130mgCarbohydrates: 66gFiber: 3gSugar: 53gProtein: 9g
BON APPÉTIT!
Love, Dedra
©QUEENSLEE APPÉTIT. All images & content are copyright protected. Please do not use my images without prior permission. If you want to republish this recipe, please re-write the recipe in your own words, or link back to this post for the recipe.
Kali
I have been making this for a few years now and it’s our favourite! Thanks so much for sharing and going into details it really is a Cheesecake Factory kind!:)
Joanie
Can I possibly double this recipe and put in a 9x13 pan. It looks amazing!!
Dedra | QueensleeAppetit
You may need to double the brownie part but the cheesecake recipe should be enough for a 9x13 pan. You won’t need a waterbath and from my experience with cheesecake bars, the baking time should only be about 40-45 minutes. Try it and tell me how it turns out!
Heike
I made your coffee cheesecake for Thanksgiving and must say that it was the most delicious, epic cheesecake ever. All the thought you put into it was soooo worth it. Thank you very much dfor this superb dessert.
Dedra | QueensleeAppetit
Thank you very much! I'm glad you enjoyed it.